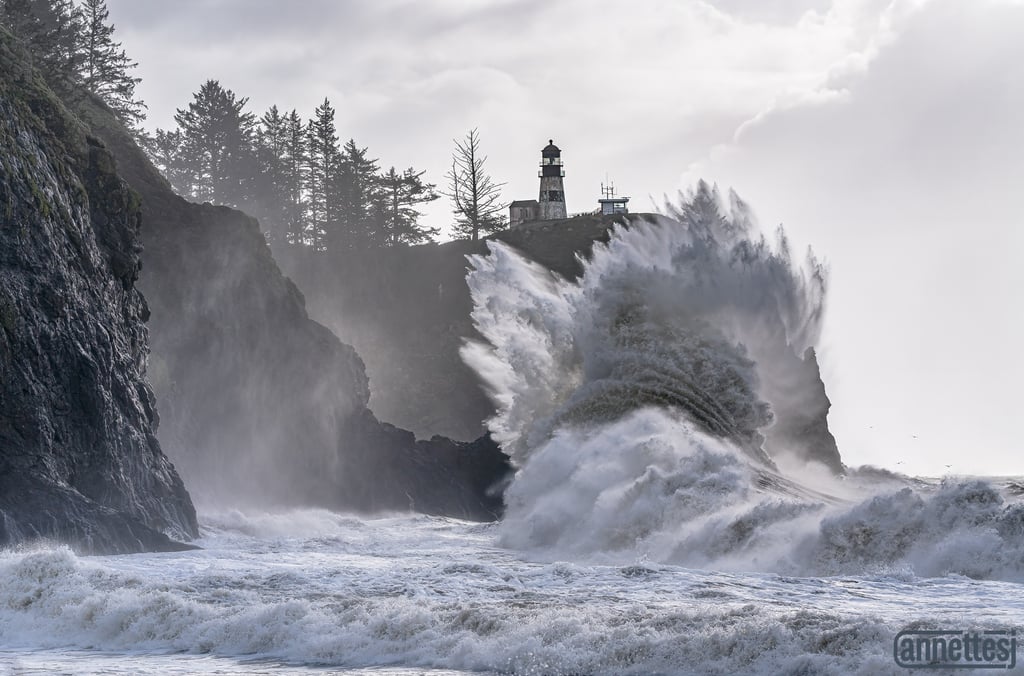
When it comes to capturing the raw power and beauty of nature, few subjects are as captivating as massive waves. If you find yourself drawn to the mesmerizing sight of waves colliding with the rugged coastline, Cape Disappointment offers a stunning backdrop for photography. In this blog post, I'll guide you through the process of capturing these awe-inspiring moments, covering everything from planning your visit to processing your images.
Location
The best place to see and photograph the waves beneath the lighthouse is from the North Jetty Parking Lot at Waikiki Beach (Washington, not Hawaii!). But, be prepared; this is a very popular location. Even on a weekday there is still a crowd when the waves are good. It pays to get there early; I arrived 1.5 hours before high tide, and most people were already there by that time. Most photographers crowd to the left corner of the parking lot. You can experiment with what spot works for you, avoiding any driftwood blocking your view.
Timing
Being there at the right time is one of the most important aspects of getting good shots. Many people favor King Tides, but a high tide level is just one aspect of getting good wave formations. For example, King Tides in December 2023 were pretty disappointing for good waves, as there was no storm system bringing in any winds. I went a few days before the official King Tide dates for January, and waves were great.
So what are the right conditions? I wanted to acknowledge at this point a very helpful blog I read from Tim Clifton. Tim's recommendations were "surf/waves in excess of 10’ and high tides of 7’ or higher. ....Wave directions of WNW to WSW (250 – 270 True) usually work well. Look for wave intervals of around 16 seconds, 13 -16 seconds should work."
I followed this recommendation with some allowance for error and was really happy with the result. The wave forecast for the day I went was 15' waves with a high tide of 12.4', wave direction of 314 degrees and interval of 10 s. So, I think there is some room for error in those rules particularly in wave direction and interval.
How do you find out the wave forecast? I used two different sources. The first source, Windfinder, is a free and easy to read website. My second source is an app, Windy. This app has a bit more detail, with a subscription. In my opinion, Windfinder will suffice for this purpose.
And now.....you wait. Wait and watch the forecasts until you get the right combination of wave height, high tide level, and importantly, high tide needs to be at the right time of day. You want to be there a couple hours before high tide. This will be the prime shooting window; make sure that time is in daylight!
Gear
You will definitely want a telephoto lens to shoot here. I took a 400 mm, although I shot most at 100-125 mm. The length depends on the composition you choose. 100-125 mm will get you entire rock face with light house and waves. Tighter shots of individual waves could benefit from a longer focal length.
Bring lots of memory cards! I filled up my 128 GB card and still wanted to take more photos. Also bring an extra charged battery. Mine lasted the whole time, but your mileage may vary.
I would also recommend a tripod. It is certainly possible at the shutter speeds required to shoot the waves to handhold, and I saw several people doing so. You may like this approach if you want a lot of flexibility in shooting individual waves. However, it is a long time to stand there for two hours holding a lens, so a tripod here makes it more comfortable.
I also used a remote release switch. This is also more of a comfort than necessity for this instance.
If it's wavy, there's a good chance it's also windy and even rainy. I brought my Peak Design camera shell, which has been great in heavy rain. Definitely bring an umbrella! You may also want to pack a foldable chair.
Bring snacks and water so you can stay in place for awhile.
Settings
I followed Tim Clifton's recommendation for a shutter speed of 1/1600 s, and was very happy with the result. I had nice sharp waves and frozen movement of the water.
I set the aperture at f/6.3; everything I wanted in focus was far away, so this means the depth of field will be sufficient. The distance between you and the lighthouse is about 2600', so if you focus on it at a focal length of 100 mm, everything from 162' to infinity will be in focus. I focused on the rock wall, which is a little closer in and closer to the hyper focal distance. Basically, this wide aperture keeps everything of interest in focus, but allows in as much light as possible, a necessity for such a quick shutter speed. You may get some shots with water spray out of focus a few feet from you at the edge of the beach, but that is not very often and can add some interest and sense of depth.
I ran my camera in manual mode with the shutter speed at 1/1600 s and aperture f/6.3. I set my ISO to AUTO. I did this because you will not want to have to be making adjustments to exposure on the fly. The waves are coming too fast for that!
I did occasionally make adjustments to the exposure compensation dial on top of the camera. The sun was coming in and out of the clouds, and I found at times that I needed to adjust the target exposure for the camera.
Shooting mode: I used MID speed continuous shooting mode. Most photographers there were using continuous shooting mode. Every time a wave would approach, the crowd of photographers would start shooting away and a chorus of clicks would commence. It's like we were nature's paparazzi.
A side note about focusing; I highly recommend setting your camera to back button focus, so that focus is separate from your shutter button. I like this method as it makes it simple to focus only when I want, and not accidentally refocus when pressing the shutter button. I use this for everything I shoot.
Compositions
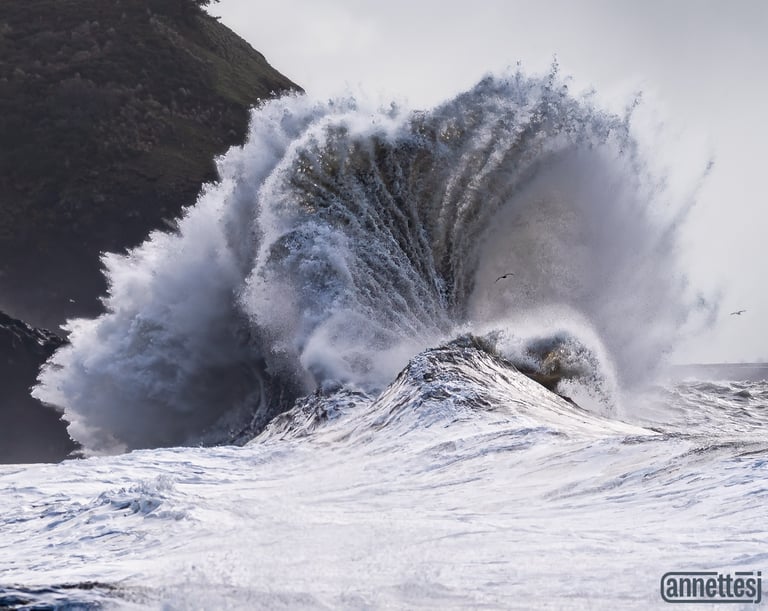
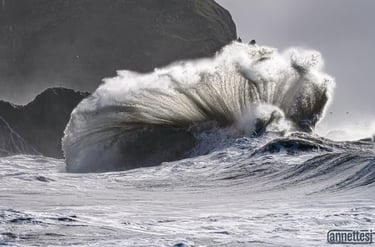
One thing I would change the next time I go is to try different compositions. I was so worried to miss a good wave that I tended to leave my focal length pretty wide so I had the light house, rock face, and all the water. Then no matter what I could catch every wave. So, for some of the single wave compositions I have, I ended up cropping down. I would much preferred to have zoomed in for at least a few shots to see if I could get a nice higher resolution shot of individual waves like this one.
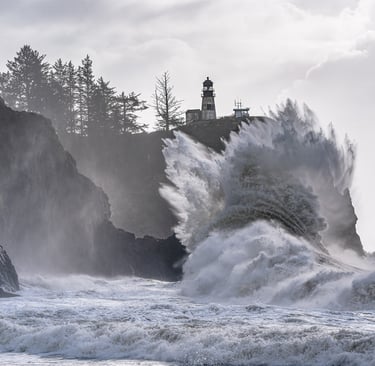
While there were some interesting waves breaking against the rock wall, in the end the compositions I chose all had waves breaking directly beneath or to the right of the lighthouse.