Mastering Focus Stacking: A Guide for Landscape Photographers
Make your photos stand out with compelling compositions only made possible by this technique.
POST-PROCESSINGFOCUS STACKING
3/22/20259 min read

What is Focus Stacking?
Focus stacking means taking a series of images with varying focus points in each image and combining them to achieve a single image with great depth of field that otherwise would not be possible with limitations of the camera. Focus stacking is often employed in landscape photos where you have a very close subject in the foreground, a mid ground and a distant background, and you wish for all of those things to be in focus.
A typical landscape photograph may feature objects in the foreground, such as flowers or rock formations, that are close to the camera, alongside distant mountains or waterfalls. When using standard focus techniques, it is usually impossible to achieve optimal sharpness in all layers simultaneously, even with the smallest of apertures. This can lead to out of focus areas, and sub optimal image quality due to diffraction at small apertures (anything over f/16). This is where focus stacking becomes essential, enabling photographers to create an image that is high quality and in focus from front to back.
The general workflow of focus stacking starts with planning and capturing a sequence of images, where each shot is focused on a different depth in the scene. A tripod is a must to ensure no movement between shots. Once the series of images is collected, software such as Photoshop can be employed to merge them, effectively combining the sharpest areas of each photograph into a singular, in-focus final image.
Compositions for Focus Stacking
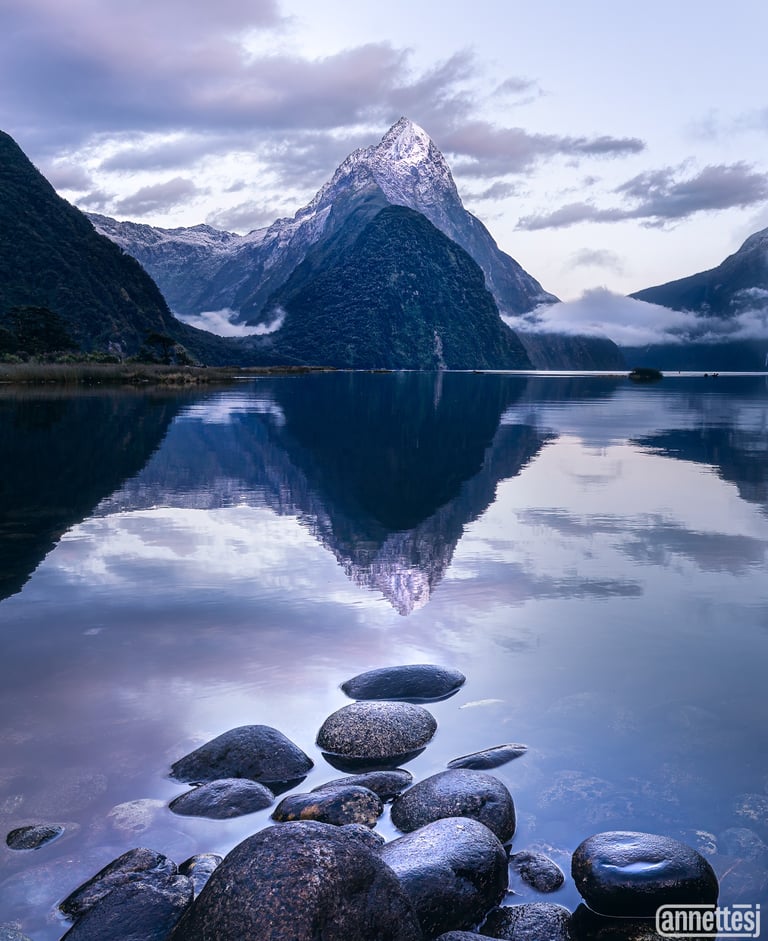
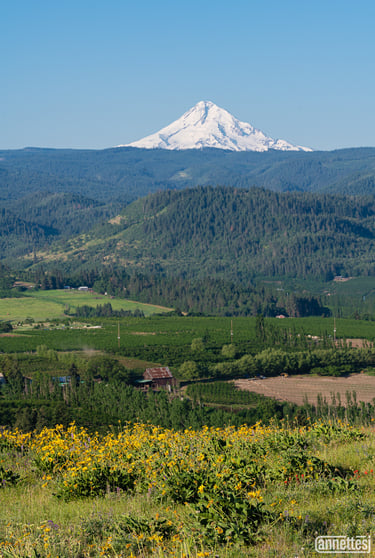
Focus stacking is most appropriate for landscape photos with a high depth of field: a very close in foreground, a midground, and distant background. The power of these types of images is that they tend to lead the viewer's eye from front to back, absorbing all elements of the story. Often the foreground elements can tell the story of the season (think flowers, fall leaves) and complement the stunning backdrop of the mountain or waterfall. The foreground could also be rock formations or sand that show how the water shapes the land. This technique not only enhances depth but also provides a more engaging narrative for the viewer.
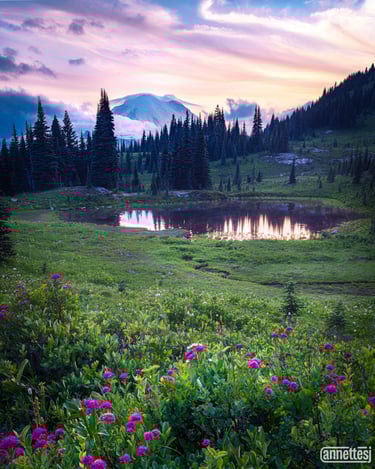
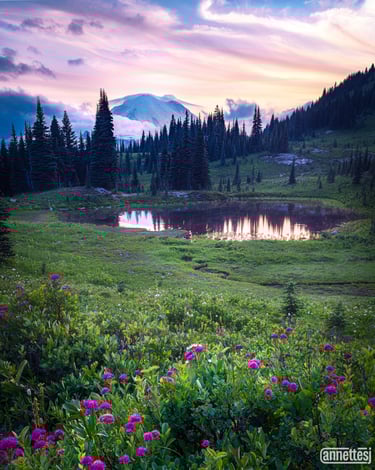
A composition with a clear foreground, midground, and background. The foreground tells the story of the place, peak summer bloom at Mount Rainier National Park.
Using leading lines can help draw attention to the layers within the photograph. Positioning pathways, streams, or edges of rocks can create a natural flow that guides the viewer from the foreground to the background. Additionally, utilizing the rule of thirds can create balance among different layers, ensuring that your composition is visually appealing. In many cases, overlapping elements can enhance the perception of depth, as it establishes clear layers within the composition.
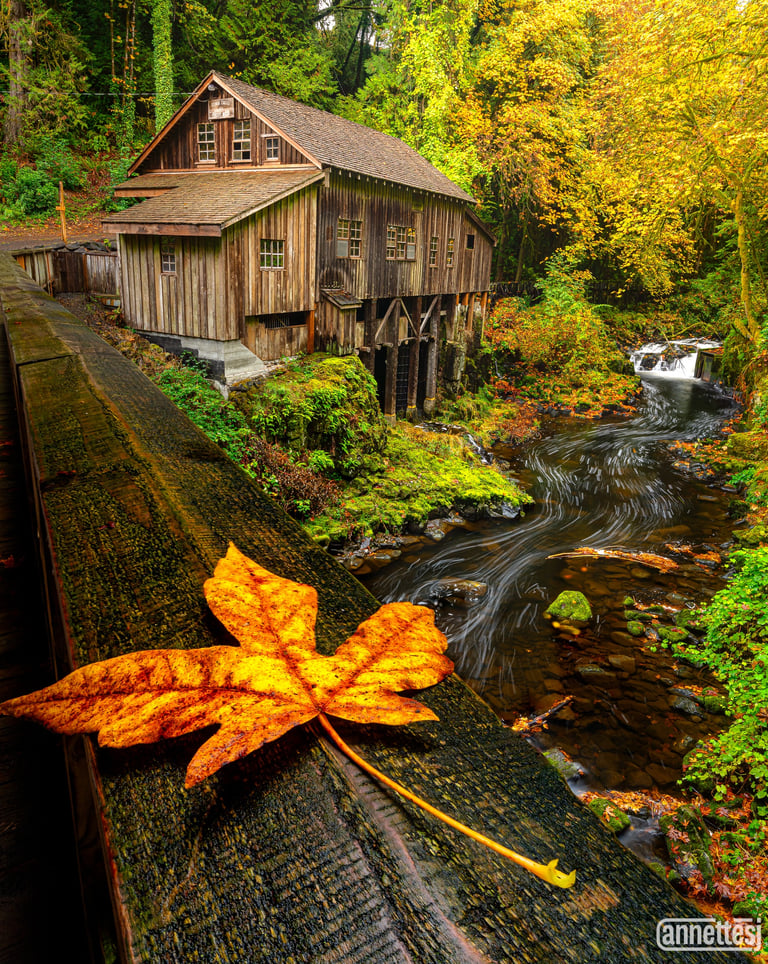

Leading line of the wooden railing leads your eye to the background of the scene, the grist mill. The flowing stream guides the eye back to the foreground. This is an effective way to hold the viewer's attention.
Furthermore, optimal angles and perspectives are key in enhancing the effect of focus stacking. Shooting from a low angle might emphasize foreground elements, making them appear more pronounced and impactful. In contrast, a higher perspective can give a broader view of the layers, showcasing the interplay of distance and depth. Be aware of "dead zones" in your image. These typically can be uninteresting mid ground areas taking up too much space in the composition. Try getting lower or higher from the ground to change the relative amount of foreground, midground, and background in your photo until you get the right balance. By being thoughtful about your composition, you not only ensure that each layer is captured but also create a harmonious image that resonates with viewers.

Example of a composition with a "dead zone." There are compelling foreground and background elements, wildflowers and a distant peak. But the midground has no leading lines or other points of interest, and is taking up a large portion of the image.
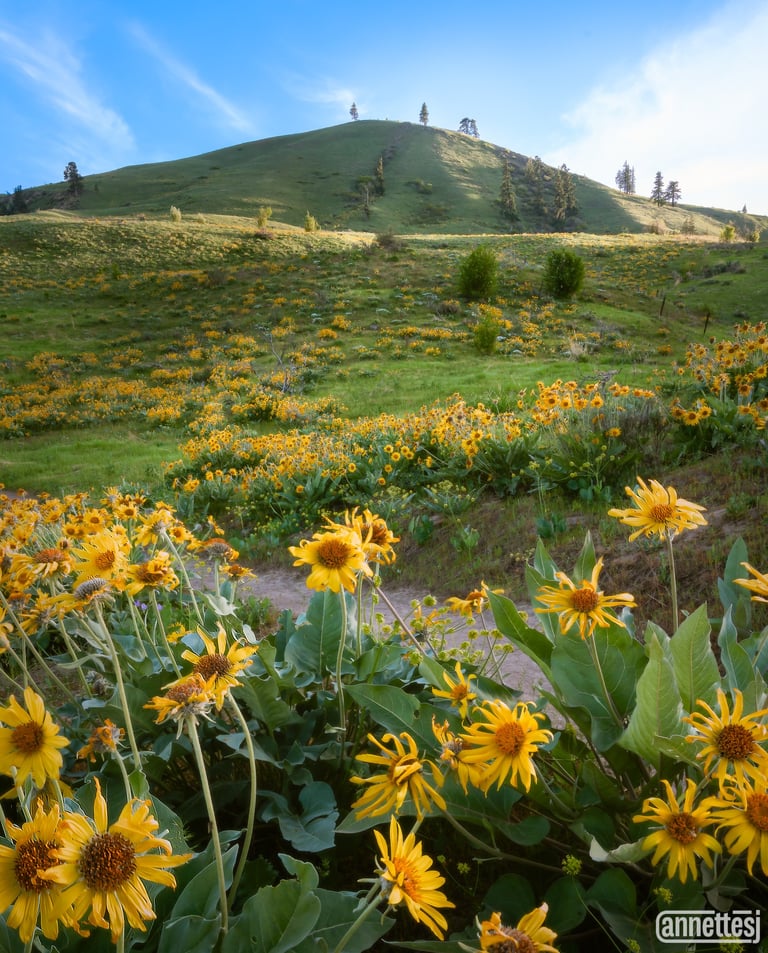

A better example, where midground takes up a smaller portion of the image. The most interesting elements (background peak and foreground flowers), predominate the image by getting lower to the ground.
Preparing for the Shoot: Gear and Settings
A sturdy tripod is an absolute must for focus stacking. Your tripod and camera stay in the same position for each image in the serious. Any movement will make it impossible to stack properly.
A wide angle lens is also generally a must for these types of images, think 16-35 mm. While you can do the same technique with telephoto shots, those are generally not the sort of compositions that will benefit from this.
A low ISO setting is recommended, ideally between 100 and 400, as this minimizes noise, resulting in clearer photographs. Aperture is ideally f/11. I like this setting as it is a good balance of providing some depth of field while still being close the the sharpest setting for my lens. You can find online what aperture is the sharpest for a given lens; generally is around f/8 to f/11. And, since we are focus stacking, we can afford to be at these high quality apertures as we will address any focus issues by focus stacking.
Shutter speed can be whatever it needs to be to balance exposure since we're on a tripod. However, keep in mind any movement in your image. If you have a waterfall, you may want a slower shutter speed to blur motion of the water. If it's windy, you may want a fast shutter speed to prevent blurring from subject motion. If there is a lot of wind, you may want to wait for a lull to take your stack of photos, or come back on a non windy day. Moving flowers and leaves can make focus stacking a nightmare!
Focusing is key in these types of photos, so we need to give special attention to our set up for focusing. First, I highly recommend to set up for your autofocus for back-button focus rather than be tied to the shutter. Autofocus with shutter can lead to accidentally refocusing your camera just before it takes the photo, rather than maintaining focus where you want it to be.
Focus area should be set to spot focus. This will show a small (or medium or large) square in your viewfinder, and autofocus will focus on this area, wherever it is. You can move this spot around within your viewfinder. This is what we want for focus stacking, as opposed to a focus area like "wide" where the camera will make it's best guess what to focus on within the entire scene.
Set your drive mode to autofocus single. Continuous autofocus is only needed for moving subjects.
Last, make sure you are shooting in RAW mode, not JPGs. RAW files will have the most data to allow for seamless editing.
Shooting the Photos: Techniques in the Field
Now we are ready to go take some photos. First things first, frame your composition. A good way to do this initially is to use your cell phone to visualize the scene at given positions and angles. Getting out your interchangeable lens camera and tripod too soon can make your composition revolve around your equipment set up, and not the other way around.
Once you have identified where you want your camera to be, get out your tripod. Set it up so that it is sturdy and level, watching out for any uneven rocks or shifting ground.
Get out your camera, put on the wide angle lens, and make sure it's clean. Put it on your tripod, and make any last adjustments in position, angle, and focal length to properly compose your scene.
Set your mode dial to manual; this will help ensure consistent exposure between images, ensuring more seamless blending later in post. Set your ISO to 100, your aperture to f/11, and your shutter speed as needed to balance exposure. Decide if there is any significant movement of your subject, and change your shutter speed as needed. Revisit your ISO to balance exposure; look at your histogram. Take some test shots to make sure you have no clipped highlights or shadows.
Now we're ready to take our series of images. I start by focusing on the nearest part of the foreground, move my spot focus to this area, hit my back button focus, then take the photo. I then sequentially move my spot focus to further away spots in the image, taking a photo each time. I usually take about five different focus spots/photos. Review your photos and make sure you don't have areas where NO image at all ever captures it in focus. This will make focus stacking later impossible.
Incorporating these techniques while shooting your photographs will enable you to capture the best possible layers for focus stacking. By employing spot focus effectively, moving methodically from foreground to background, and ensuring consistent exposure and framing, you set the stage for creating a single image in focus from front to back.
Post-Processing Your Focus Stacked Images
Once you have captured your series of images for focus stacking, the next phase is post-processing. Several software options are available for merging focus-stacked images, with Adobe Photoshop being my personal choice and what I will describe here.
I begin my importing my photos into Lightroom Classic. I apply basic lens correction, and a consistent amount of texture and sharpening to each image so I can really tell which images have what parts in focus. I review each image and select my best set for stacking. My best set will make sure that I have at least one photo in focus for each area of the scene. I select all those photos, right click on them, then select "Edit In" and "Open as Layers in Photoshop."
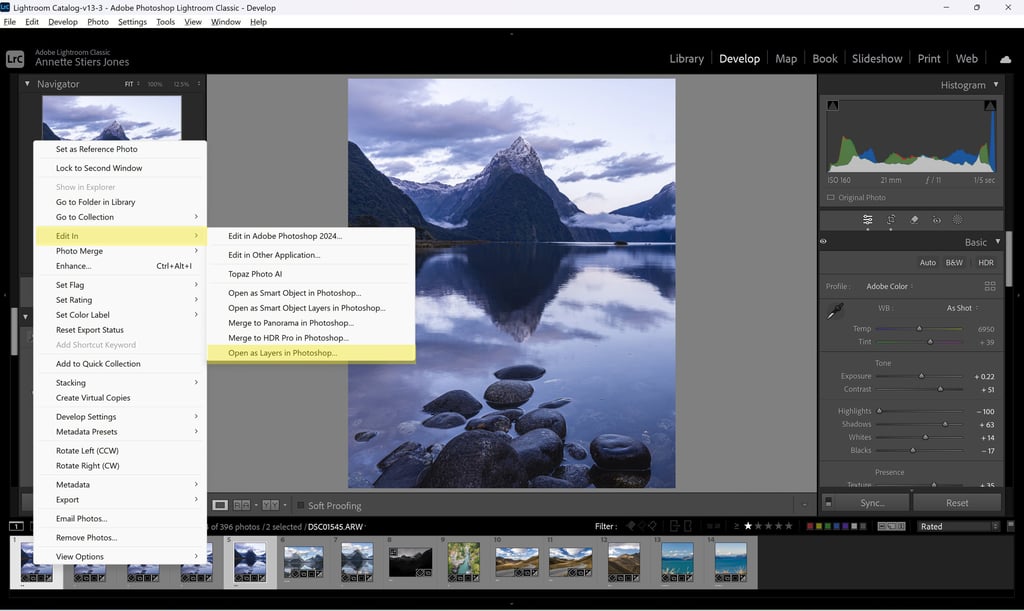
In Lightroom Classic, right click on your selected photos, then choose Edit In, then Open as Layers in Photoshop
Once imported, the photos will appear as a stack in the "Layers" panel. Select them all by clicking on the top photo, hold Ctrl+Shift, then select the bottom photo. Ideally these photos are already aligned since we used a tripod and didn't move it. But, sometimes small movements happen. In Photoshop, you can utilize the 'Auto-Align Layers' feature to ensure your images are correctly aligned. You can find this by selecting Auto-Align from the Edit menu. Choose the Auto mode in the pop-up dialog and hit enter. Photoshop will automatically align the images.

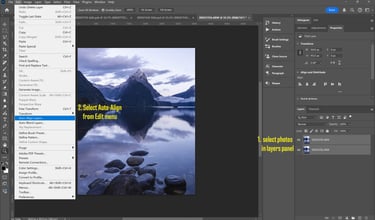
Select photos to merge in the layers panel. They should appear highlighted when selected. Then choose Auto-Align from the Edit menu.
Photoshop can also automatically blend the layers based on what is in focus. Still with all your photos selected in layers, go to "Auto-Blend Layers" under the Edit menu. Choose "Stack Images" and check the two boxes below. Photoshop will then automatically create a layer mask for each photograph, blending the in focus parts of each photo.
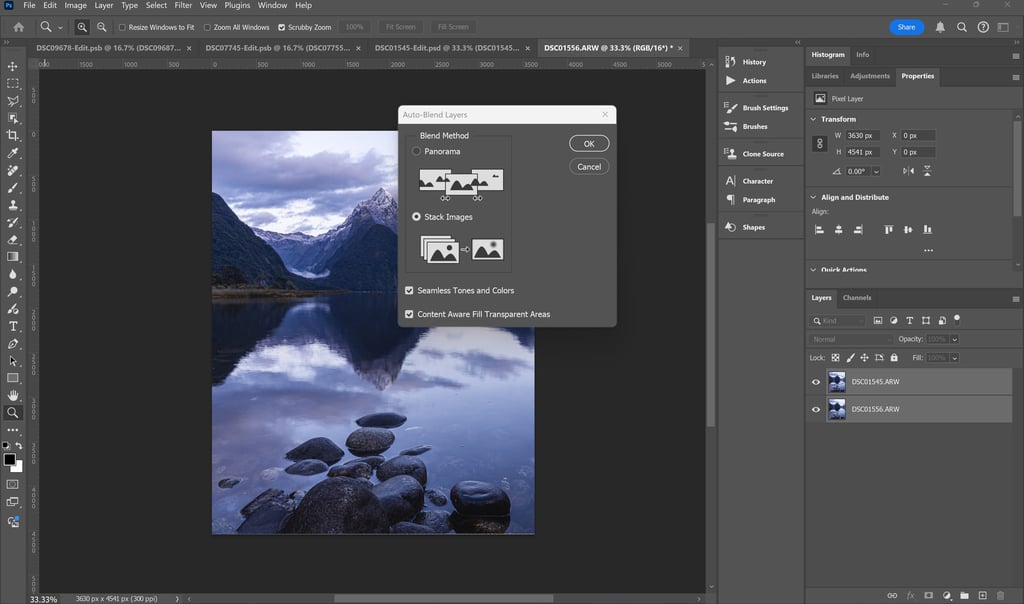
Auto-Blend Layers Dialog. Choose Stack Images, and check both boxes.
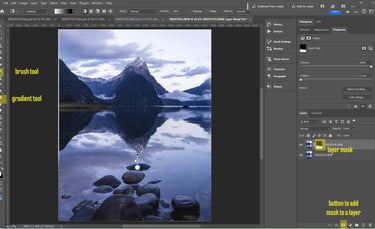
The blending step can also be done manually; Photoshop usually does pretty well, but sometimes it can struggle. That is the case with this particular example. The slightly rippled water makes it difficult for Photoshop to tell what is in focus. This is when it's important to use masking skills to blend the in focus part of each image. You can apply a mask to a layer by selecting the layer and clicking the mask button below the layer panel. You can then use a variety of tools to adjust the mask to show only the in focus area. Remember white reveals and black conceals whatever parts of that layer the mask is attached to. Editing layer masks is an entire post of its own! At it's simplest, you can edit the mask by selecting it, (click on the mask not the picture), then access the brush tool by clicking "b" on your keyboard. Hit "d" on your keyboard to make sure you have black/white color swatches loaded. You can then switch your brush between black and white by hitting "x" on your keyboard. You can now paint the mask in black or white where appropriate, using the brush on the display. Do this for each layer, clicking the eye symbol on each layer to hide/reveal the layers below.
In this example, I applied a mask to the top layer, the foreground image. I used the gradient tool (keyboard shortcut "g") in a simple white to black gradient to reveal the foreground and conceal the background. Then, the in focus background of the bottom layer shows through, and the entire image appears as in focus. I also used a little brush on the cloud area of the mask to create a more seamless transition.

Final Thoughts
Mastering focus stacking is a valuable skill that significantly enhances the quality of landscape photography. It is one of the key ways, in my opinion, to make your photos stand out from run of the mill photos that can be taken with a smart phone. It stands out from the crowd with unique compositions that can only be created by employing this technique. These compositions are not only unique but also captivating, leading the viewer through the various layers of your image and telling the story of a place.
Contacts
annette@annettesjphoto.com
Socials
Copyright © 2023-2025 Annette Stiers Jones Photography. All rights reserved.