Organizing Your Lightroom Catalog
Make it easy to find the exact photo you need
LIGHTROOM CLASSIC
Annette Jones
3/4/20257 min read
Order from Chaos
I've been building my portfolio of landscape photos for a couple years now. I am finding that I can no longer easily get to photos by remembering the general date. And, at present, I am recuperating from a surgery for a few weeks, spending most of my time on the couch. I have lots of time, and lots of photos; it's the perfect time to get organized!
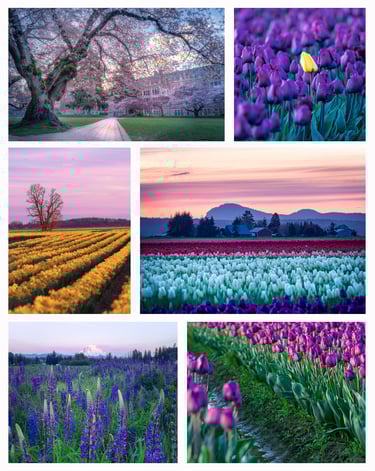
When I set out organizing, I had a few goals in mind. I wanted to be able to find photos of similar subjects, places, and seasons. This would be useful for creating carousels of like images in social media. I also wanted to be able to find my best photos for submission to art shows and photo contests. And, I wanted to remember what the view was like from a particular location, to know what to expect should I revisit that location. Lightroom's Metadata search can make all this happen in just a few clicks, once you put in the upfront work of adding ratings and keywords. I used it to compile this collection of my favorite Spring Bloom photos shown above.
Adding and Organizing Keywords for Your Landscape Photos
Keywords are the key to organizing photos in Lightroom. For me, I struggled with knowing at first what I wanted to use as keywords. I ended up with four main categories of keywords to search for exactly what I want:
Colors: Many times I am looking for images to suit the decor of a certain room, or images that are a harmonious palette. Tagging photos with the primary colors represented helps me to find the right photos easily.
Season: I often look for sets of images in the same season. This can be helpful when I want to build a seasonal collection for my store, timely images for a calendar, or a seasonal carousel for Instagram.
Place: This is helpful when I want to revisit a certain location and remember the vista. Or, if I want to see my entire collection from a certain place, like Mount Rainier National Park.
Subject: Keywording the subject is the most direct way to find an image. I can find all the images I've taken of the Space Needle, the Moon, the Milky Way, sunrise, sunset, wildflowers, etc.
All of your keywords can be grouped, and that is I exactly what I have done with mine. I have them bucketed into these major groups listed above. This makes it easier to make sure I'm recording all the major pieces of data about a photo. I go through each bucket and add colors, a season, a place, and a subject. You can choose whatever you like that works for your catalog, but if you're organizing landscapes, I highly recommend this structure.
How to Add Keywords
The first step to add keywords is to navigate to the LIBRARY module at the top of the screen. Then navigate to the folder you want to keywords, selecting the folder from the left panel. You should then see thumbnails of the photos in the center of the screen. If you only see one photo, you can click on the Grid View icon to see more photos.
Select a single photo or multiple photos by clicking on the thumbnails. Ctrl+shift and click another photo to select multiples, or Ctrl A to select everything in the folder. If all photos will have have the same keywords, you may as well select them all and then you can keyword them all at the same time. If they will have different keywords, you can select a few at a time.
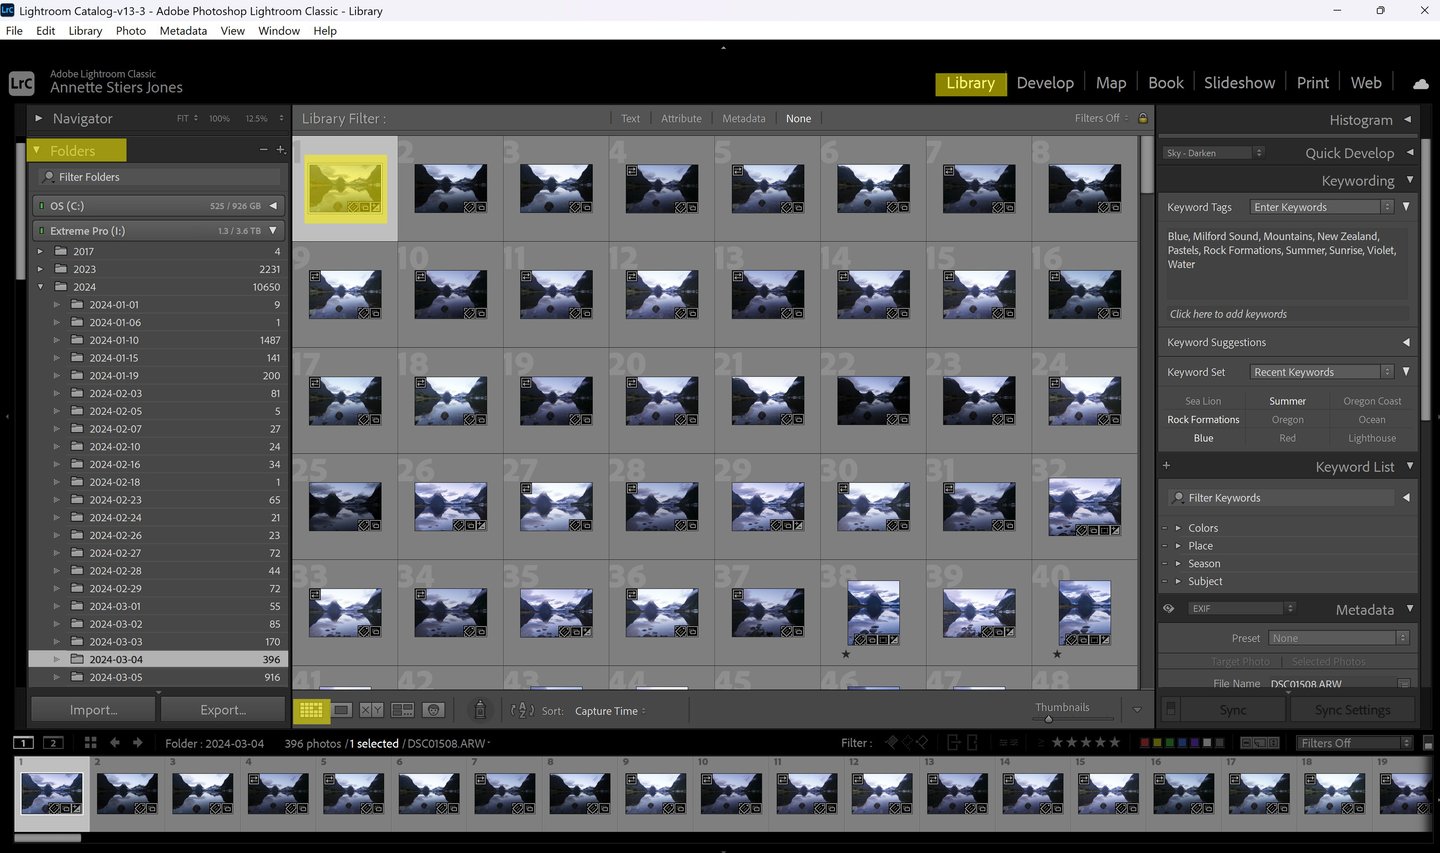
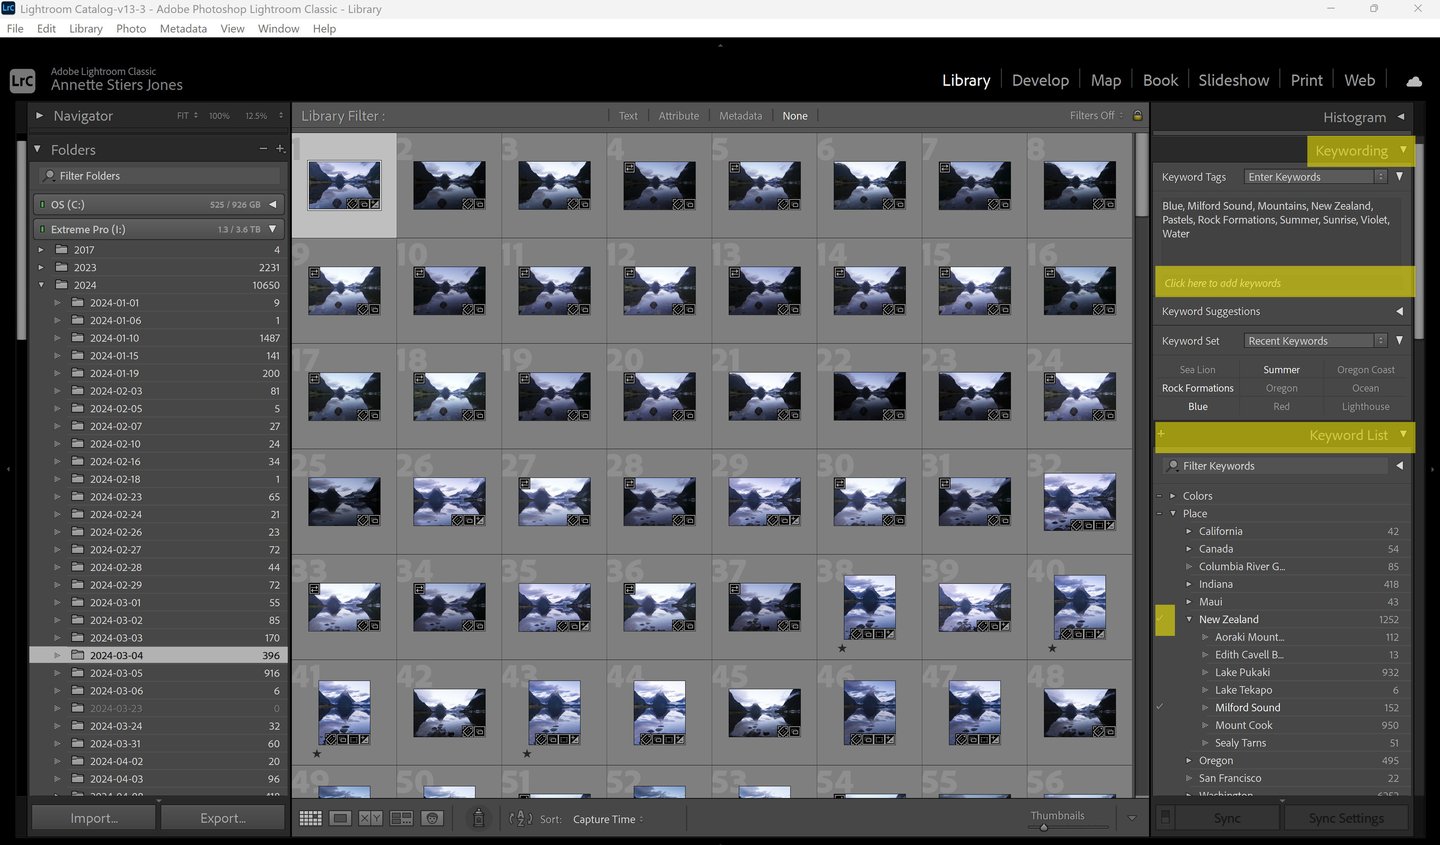
Once you've selected your photos, go to the right panel and click on the Keywording carrot so you can see the Keywording panel. At the box where it says "Click here to add keywords", add whatever keyword you like and click enter. You will then see the keyword added to the photos as shown in the box above. Multiple keywords will be separated by commas. Keywords that are only attached to some of the photos selected will display with an asterisk.
Keywords you add here will be added to your Keyword List, the next panel below. This is where you can organize your keywords. You can click the plus sign by Keyword List to add a new keyword here; but, if you add it here, it will just be added to the list and not to a photo. This can be nice if you want to add categories for your keywords, like Location, Season, Subject, etc. They basically function as a folder, and you can drag and drop keywords underneath them like files in a folder.
Once you have a nice Keyword List going, you can then leverage this to keyword you photos instead of typing them in. As before, select your photo thumbnails you want to keywords. Then, go to the Keyword List and click the checkbox next to the keywords you want to add. They will appear in the keyword box in the Keywording panel after you click them. This makes it really fast to keyword images of subjects that you routinely photograph.
Using Ratings, Stars, and Flags for Photo Organization
Stars and flags are another great tool for organizing, in addition to keywords. Keywords tell you about what's in the photo; ratings and stars are a subjective measure of how good the photo is.
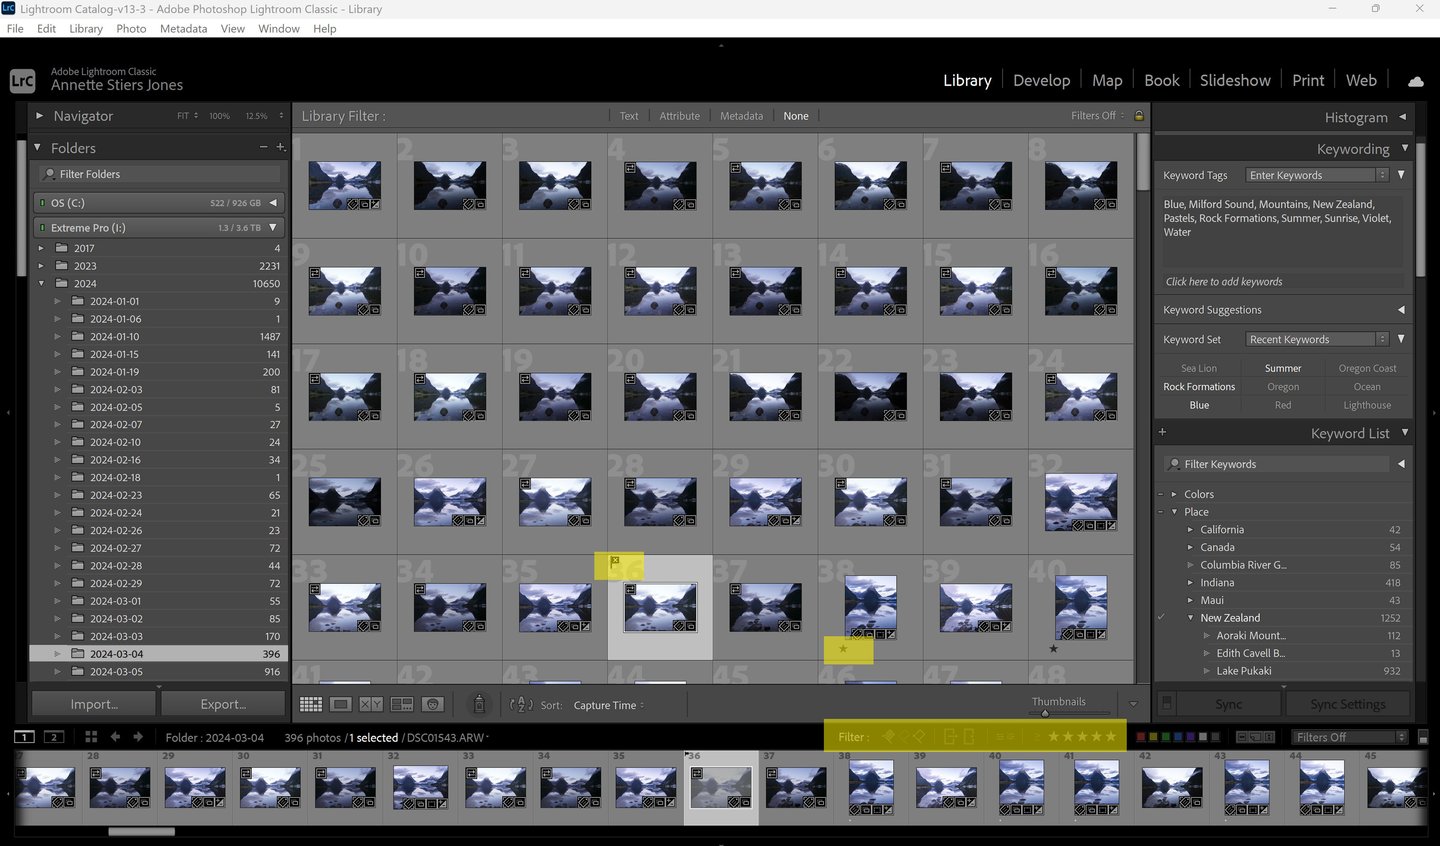
Stars are rated on a scale from one to five, allowing photographers to provide a nuanced evaluation of their images. Flags, on the other hand, offer a binary option, where photos can be marked as "Pick" or "Reject." This method is particularly effective during the initial review process, allowing photographers to quickly eliminate subpar images. A "Pick" status can indicate an image worth editing or further consideration, while a "Reject" flag helps keep your catalog streamlined and clutter-free.
Flags and stars can be added in either Library or Develop modules. They are easy to add with keyboard shortcut. Hit X to flag a rejected photo. Bracket keys can be used to quickly assign a star value. This is generally what I do when I review my photos and decide what to develop. I reject any blurry images, bad exposures, etc. I add one or two star to any images worth considering for further processing. Four and five stars are reserved for my best images for printing and display.
Stars and flags can be added in either Library or Develop. You can also use the filter on the filmstrip to filter by stars or ratings. Don't get this confused with the much more powerful search features of the Library module (more on that next).
Searching Metadata and Creating Custom Metadata Searches
One thing that I struggled with early on was how to effectively use keywords to search my photos. Part of the confusion for me was that the Develop module does have some limited filtering options at the bottom of the screen on the filmstrip. But, this is very minimal compared to the power of keywords and metadata searches in the LIBRARY module.
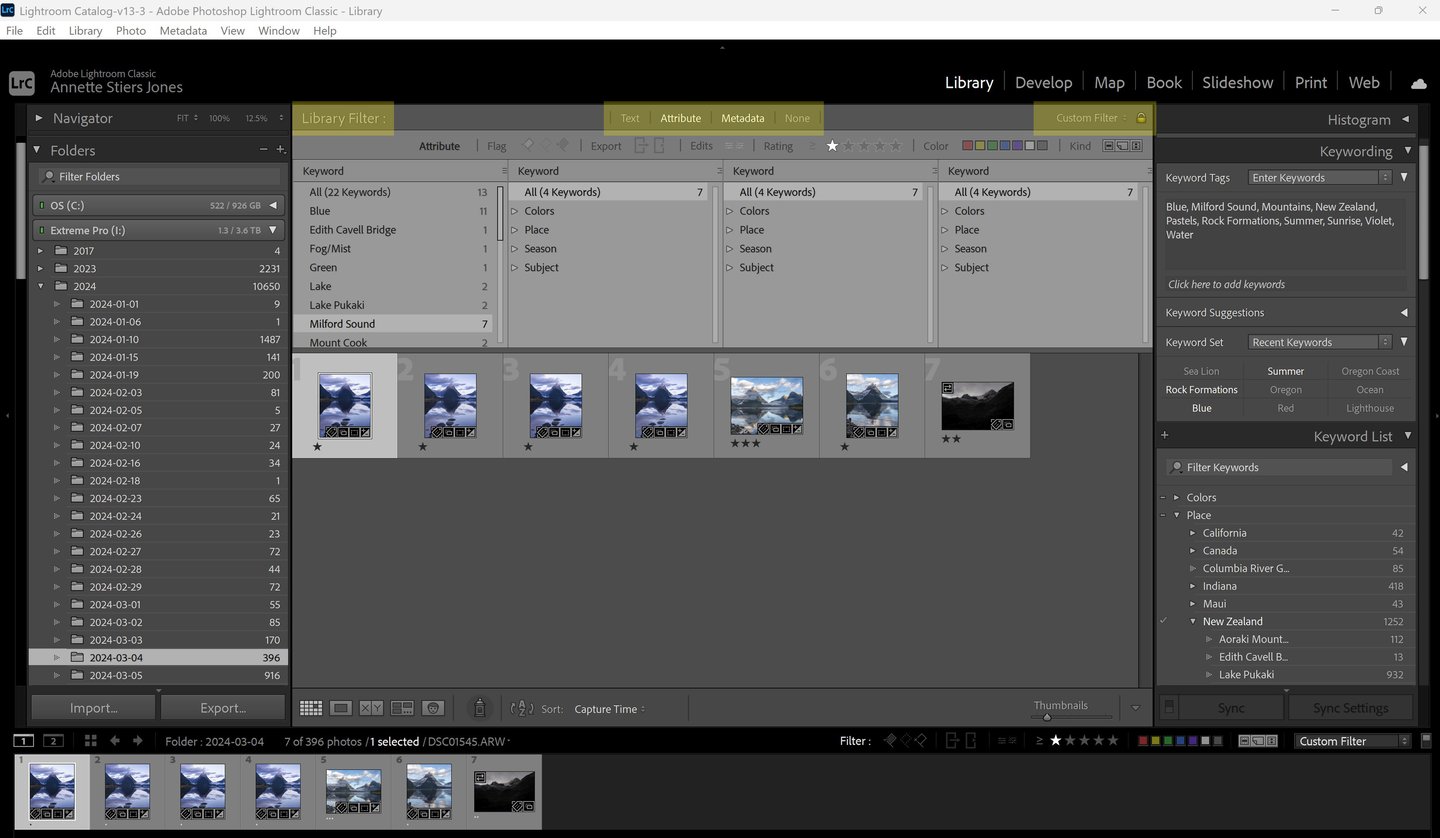
Navigate to the library module. You want to make sure you can see the FILTER BAR at the top of the screen. You can toggle this on or off with the "\" key. You can also go to View>Show Filter Bar from the menu if you are not seeing the filter bar. It's hard to learn to use something if you can't see it there!
My favorite way to search is use the Attribute and Metadata part of the Filter Bar. Click on Attribute so it is highlighted white. Then do the same for Metadata. It will then show you a bar you can use to filter by different attributes: flags, stars, edit status, and export status. You should also see four columns for Metadata. You can change these columns to any Metadata you like, but since you've spent all this time adding keywords, let's change it to that! Just select Keyword from the drop down for that column. All of your keywords should then populate the column. Just click on whatever keyword you like, and it will show you all the photos in that folder with that keyword.
If you're not seeing the photo you need, make sure you are searching within the correct folder. Select the correct folder from the left panel. Just note that when you move from one folder to another, the Library Filter resets to "None" if you do not have the filter locked by checking the locked symbol. This is on the right side of the filter bar.
Next to the lock symbol is the Custom Filter drop down. If you really like your current settings, you can save them here by selecting "Save Current Settings as New Preset." For my favorite search, I have the Attribute bar turned on and Metadata on with all columns set to Keywords.
In this example, I've searched for all my photos tagged with keyword "Milford Sound" that are rated 1 star or above.
A Few Words on Collections
The other struggle I had when starting out with keywords was when to use keywords versus when to use collections. There are two types of collections: regular Collections and Smart Collections. Regular Collections are any set of photos that you manually assign to it by drag and drop. It's like a virtual folder. The location on your hard drive doesn't change. You could group any set of photos that don't match any keywords. Smart Collections are made based on Metadata. You set up rules for what is included in the collection (all photos tagged with Mount Rainier, any photo rate 5 stars, etc.).
My best advice here is, collections are best reserved for keyword/metadata combination searches that you repeatedly do and want to access quickly. Keyword searches are best for flexibility, to be able to parse your search as needed. For example, with keywords and metadata searches, I can search for all the photos I've taken of Mount Rainier. I can then refine the search to look for any photo I've taken of Mount Rainier in the fall, in the summer, with wildflowers, etc. I can add and change levels to the search. With collections, those parameters are fixed. You simply click on the collection, and it will find all the photos that meet the metadata requirements for the collection.
Get Organized!
I hope this was a helpful read. If you're like me, this was a long neglected tool in a program I use all them time. I'm already seeing the benefits of organizing, and I'm glad I've invested the time. I can find things so much easier, and found some old treasures buried long ago under newer photos.
Contacts
annette@annettesjphoto.com
Socials
Copyright © 2023-2025 Annette Stiers Jones Photography. All rights reserved.