Capturing the Milky Way Part 1: Taking the Photos
Learn how to shoot Milky Way photos with no star trackers required.
NIGHT PHOTOGRAPHYMILKY WAY
4/19/202512 min read
This week is International Dark Sky week. International Dark Sky week is a worldwide celebration night to build awareness about the harmful effects of light pollution and the importance of the global nighttime environment. One of the best things about truly dark skies is the ability to see the Milky Way, something you otherwise cannot see with all the city light.
I paused to reflect that before I started getting more serious about photography, I had never seen the Milky Way before, or at least hadn't noticed it was there. But after learning how to shoot these kinds of photos and knowing where to look for it, it's there plain to see. It is fainter to the eye than to the camera, but it is visible to the naked eye when you are in a dark sky area and you look up at the right time. It really is a magical experience to be out in nature in the dark, witnessing the universe go by.
In this week's blog post, I will describe how to shoot Milky Way photos. Next week in part 2, I will describe how to process the photos. It is one of the more difficult subjects to photograph, but learning how to shoot the Milky Way really leveled up my overall understanding of photography. And, check out more great Milky Way photos here in my gallery.
Where to Photograph the Milky Way
Capturing the the Milky Way begins with selecting the right location. It is crucial to find areas with minimal light pollution. Urban environments are often riddled with artificial lights that hinder the visibility of stars. Therefore, it is advisable to venture into remote or rural settings that offer dark skies conducive to Milky Way photography. There are many resources for finding dark sky maps, but I like this one for it's ease of use.
The best places to find dark skies in Washington are in the Cascades or Olympic National Park. These locations not only provide darker skies due to their protected nature, but they also often feature varied landscapes that can serve as compelling foreground elements. Elements such as mountains, trees, or lakes can significantly enhance your composition, creating a more visually appealing image.
When scouting for the ideal composition, you will want to position yourself facing some variation of south. In the early Milky Way season, the Milky Way appears to the southeast. In mid summer, it is more directly south. And late season, it is to the southwest. It is best to use a planning app like PhotoPills to understand when the Milky Way will be where. It can tell you for any day, time, and position, where the Milky Way will be. If you'd like to read more about using PhotoPills to plan alignments, check out my blog post here. This post for was sun and moon alignments, but the process is much the same.
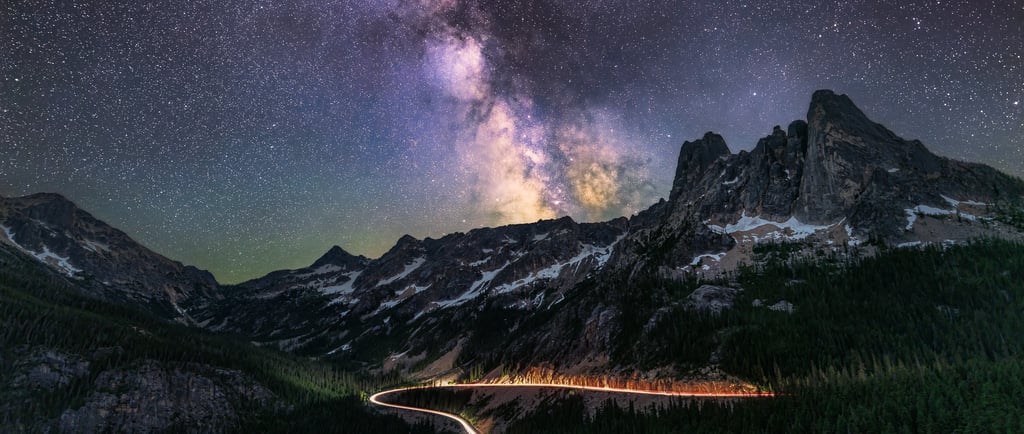
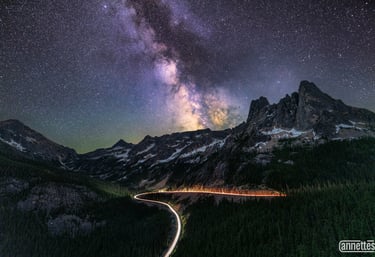
Two of the best spots to photograph the Milky Way are Washington Pass and the Sunrise area of Mount Rainier National Park. Washington Pass is an easy walk from the parking lot to the viewing area, which is nice for anyone with concerns about hiking in the dark.
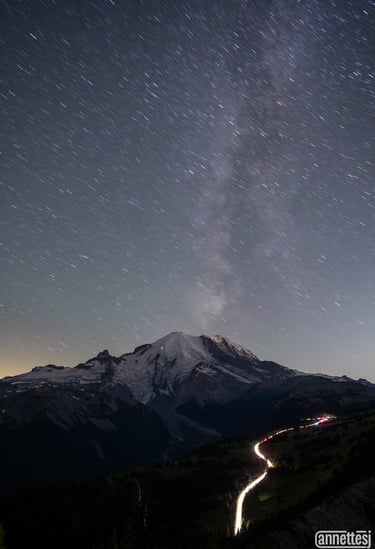
Sunrise is similar in that you do not have to go far from the parking lot to get a composition of the Milky Way with Mount Rainier. However, if you are up for the risk of hiking further, Fremont Lookout is a great spot for this vertical alignment shot.
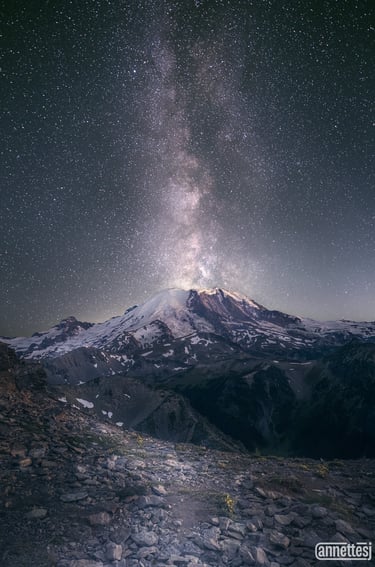
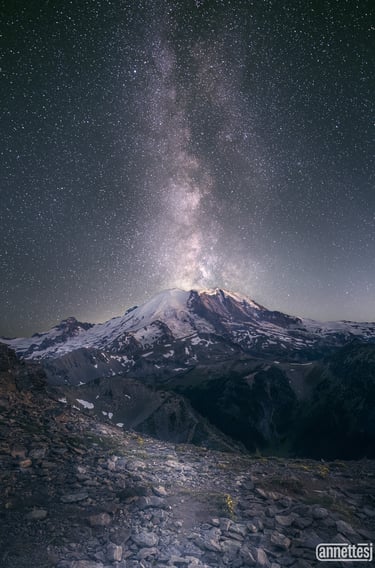
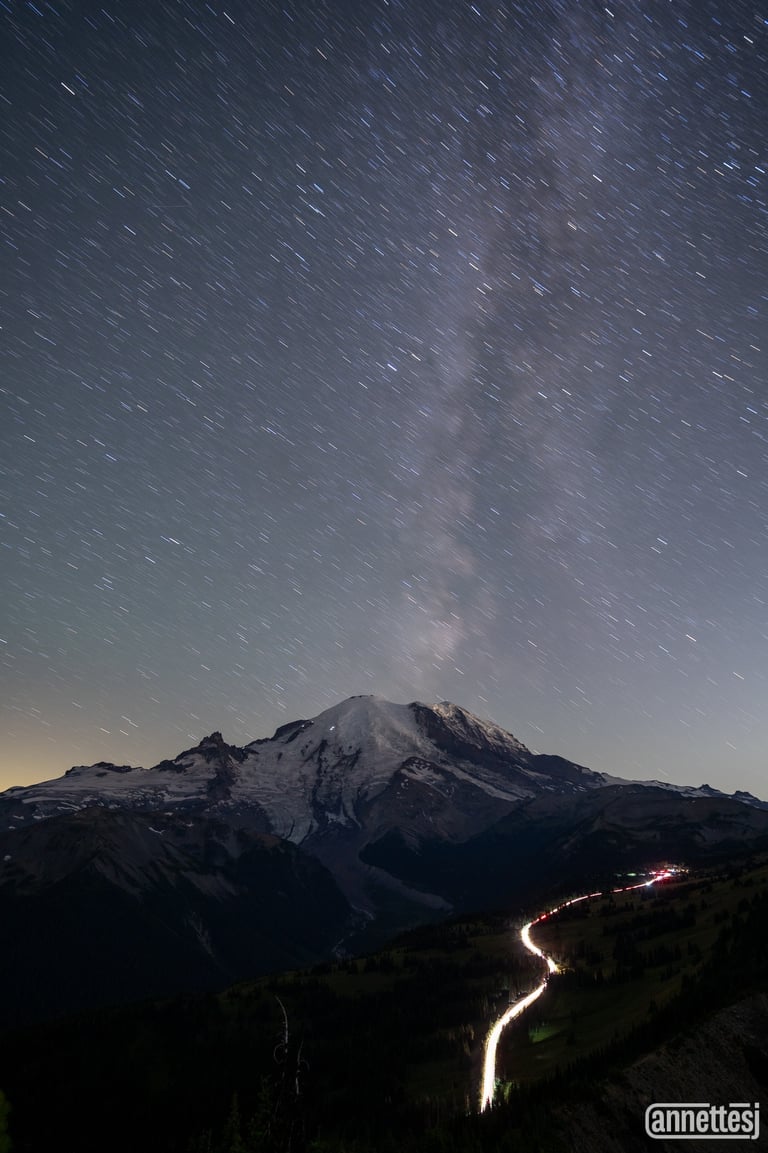
Vertical alignment of Milky Way with Mount Rainier, as viewed from Fremont Lookout
When to Photograph the Milky Way
In the northern hemisphere, the Milky Way season is from March to September. During this time the core, the most dense part of the galaxy, is visible. In the southern hemisphere, it is the opposite. You may also want to consider what you plan to have in your foreground to determine when to go. As mentioned, the position starts to the southeast in March, then gradually works its way over to the southwest by September. For example, one composition with Mount Saint Helen's is best in the early season due to the position of the Milky Way, but that view is not currently accessible to anyone due to the road closure.
Now that you've narrowed down the month, narrow down to the week. This is best done by targeting a time with a new moon or a crescent moon. Photographing during such periods minimizes the interference of moonlight, which can wash out the finer details of the stars. It is beneficial to consult a lunar calendar to schedule your outings effectively around these moon phases. You can find all this information in PhotoPills.
Next, select your day. This you can best narrow in from the weather. In addition to selecting the right moon phase, weather conditions significantly influence the quality of your astrophotography. Clear nights with minimal cloud coverage are ideal for capturing the Milky Way, as clouds can obstruct views of the stars and diminish photo quality. Be sure to look at conditions near your shooting locations, as mountains often make their own weather.
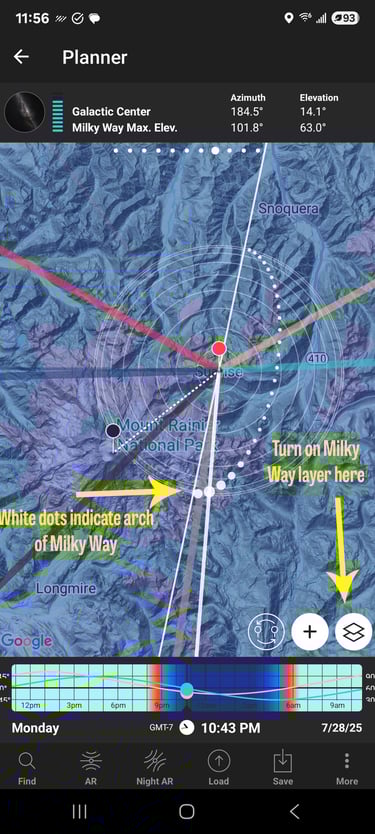
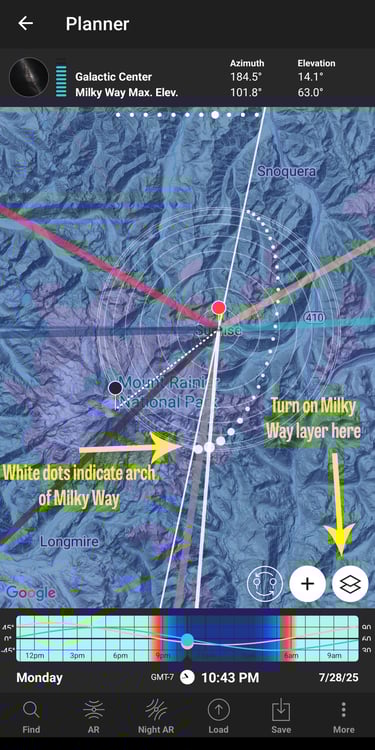
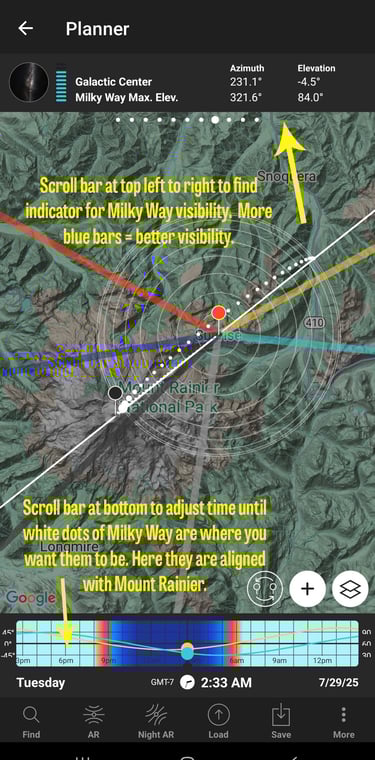
The exact time is best determined by PhotoPills. Definitely check out this blog post on planning alignments. The only difference here is you want to have the Milky Way Layer turned on in the layers panel. The Milky Way will then appear as this dotted white arch. The core will appear as larger white dots. Put your red pin where you are, and your black pin on your subject (in this example, Mount Rainier). Then drag the time slider until you can align the Milky Way to it's desired position in relation to your subject. Here I have the Milky Way exactly in line with Mount Rainer. I like this composition, but some others prefer to place the Milky Way to the left to see more of the core (the core is less visible when blocked by the full height of the mountain).
With careful planning around the lunar cycle, favorable weather conditions, and the right season, photographers can optimize their chances of capturing breathtaking images of the Milky Way.
Screenshot of Photopills App

Screenshot of Photopills App
Gear
While smart phone cameras have come a long way, I still recommend a digital camera to get the most amazing images. Digital cameras, especially those with larger sensors like APS-C or full-frame, collect significantly more light than smartphone sensors. This leads to less noise and higher image quality, especially in low-light conditions like when photographing the Milky Way.
One of the essential items for successful milky way photos is a sturdy tripod. Each exposure for the night sky is going to be several seconds; images for the foreground may require exposure of several minutes. A solid tripod stabilizes the camera during long exposure shots, and keeps your foreground and sky images aligned.
Consider what you need for the environment you will be in. It will likely be colder up at elevation; bring layers. Bring a packable chair if you'll be there a long time. Bug spray, bear spray, and the 10 essentials if you're hiking very far. I also like to have a satellite communicator in case of emergencies. And most importantly, it's crucial to have a reliable headlamp for visibility. Opting for a headlamp with a red light feature is advantageous, as it preserves night vision while allowing for adjustments in complete darkness. Be aware of other photographers around you and dim you headlamp, making sure to not get stray light into their shots. And if you're a pro, please be nice to the newbies and people who make mistakes with this. It's supposed to be fun!
Bring a fast wide-angle lens. Lenses with a wide maximum aperture (such as f/2.8 or wider) enable maximum light capture, which is crucial for collecting all the light you can get. The wide-angle perspective also allows for expansive sky images, making the Milky Way galaxies appear more profound and prominent against the night backdrop. I use a Sony FE 16-35mm f/2.8 GM.
You will also want a shutter release cable. This will be necessary for the longer exposure shots for the foreground. Anything longer than 30 seconds is "bulb mode", and this requires a cable with a button to lock the shutter open for the required amount of time. There are also wireless version available.
Settings for Milky Way Photography
First let's talk aperture. I always have my aperture set as wide open as possible, f/2.8 for my lens. I want to allow in as much light as possible. Usually this is fine for focus, as distant mountains and the sky will all be in focus even at 2.8 with a wide angle lens. For example, at a focal length of 16-20 mm on my camera, the hyperfocal distance is going to be about 10-15 feet away, meaning everything that distance and further away will be in focus. You can find out what it is for your camera here.
Next, shutter speed. You will need to collect two groups of exposures; one for the foreground, and another for the sky. The key consideration for the sky images is how long to keep your shutter open without resulting in star trails. The stars are moving (or rather, we are), and with long enough exposure your stars will cease to be pinpoints and turn into tic tacs. Star trails can be beautiful in their own right, especially after hours of exposure, but this is not a good tactic for capturing the Milky Way. The shutter speed you need to preserve spot stars is going to depend on the focal length and your sensor size. Longer focal lengths and larger sensors will require faster shutter speeds to preserve spot stars. So, when I upgraded from my Sony A7RIII to A7RV with a larger sensor, in theory I lost about 1 second in exposure time before trails start to form. One simple rule that has been proposed it to divide 500 by your focal length, and this will give you the maximum exposure time in seconds before trails form. However, this is often too lenient I have found. It would suggest shutter speeds around 25 seconds for 20 mm, but I find I still see too much trail for my taste. I generally shoot around 8-15 seconds. I take a few test shots and decide what looks best.
That covers the sky shots; now for the foreground. The foreground will be much darker, therefore it requires a much longer exposure time to bring out any details in the mountains. One way to tackle this is to do a blue hour blend. This can be done by setting up your composition just after sunset (or right before sunrise, pending which is closer to your planned time for the Milky Way), shooting shots of the foreground, then leave your camera there without moving it until it gets dark and the Milky Way arrives. I have not done this many times, as it can often mean waiting several hours. Another alternative for exposing the foreground can be to shoot with a little moonlight from the crescent moon. If you don't have that, you can just do long exposures (several minutes) to exposure the foreground. I have done exposures anywhere from 3-6 minutes for the foreground.
And the last part of the exposure triangle, ISO. We have to rely pretty heavily on high ISO in order to expose in this low light environment. I like to use ISO 400-500 for the foreground, potentially pushing even higher if several minutes of exposure time is still not enough. For the sky shots, I generally keep ISO around 5000.
White balance is next. I will admit a lot of times I forget and leave it in auto white balance. BUT, 3850 K is where I would like to set my temperature. I have certainly processed images at other white balances just fine, and correcting it later in Lightroom. It is a best practice though to set a temperature in the 3850-4000 K range. This gives the best representation for true color, and sometimes when you first start out editing Milky Way photos, it's hard to know what those colors are really supposed to look like. The camera is capturing colors that we can't see with the naked eye, so starting off on good footing is helpful.
Another good tip is to turn down the brightness of your camera monitor. This can sometimes be hard to find, so you may want to add it to a favorites menu or a custom button. This will save your night vision and be less annoying to other photographers.
Make sure you are taking RAW photos. This will allow more flexibility in editing later.
Taking the Photos
So you've planned your shot, you're on location. What next?
The first step is to plan your composition. If you are starting out at blue hour, or if you've had a chance to scout the location, this is easier. But, if you're like me, you hiked about to Fremont Lookout in the dark, and all you can really see is what is illuminated by your headlamp, the outline of Mount Rainier, and the faint white glow of the snow on top of it.
First I set up my tripod and set up my camera, and plug in the remote shutter release. I set my aperture wide open. I set my ISO to something really high (like 12800 or so) so I can see better what is in frame. I set my camera to manual focus and adjust as best as I can (it will be hard with all the noise at a really high ISO). One thing that can help is to pick a really bright star in the sky as your point of focus, and adjust until it is at it's smallest (no out of focus haloes). I then take a test shot at 30 seconds see if I like the composition and if it's really in focus. I then adjust the tripod position as needed until I like the basic composition.
Then I turn the ISO back down to something closer to 400-500, and take a 3-4 minute exposure for the foreground. It will be easier to check focus at lower ISO. I then bring up the resulting image for review to see if it's really in focus. I adjust the focus ring manually, making note of the focus distance for the first and second image. I make slight adjustments and take repeated exposures until I have an image I like. I might bump up the ISO or increase the exposure time if the image is still too dark.
I take a few images like this of the foreground. Sometimes if there is still a lot of noise in the foreground, I can later stack repeated exposures to reduce the noise. This can take awhile; the foreground is definitely the most time consuming part of the shoot. You can leave this until after shooting sky shots if the timing works out better for you. The main things is to be sure you like the composition and will not want to move your camera after taking the sky shots.
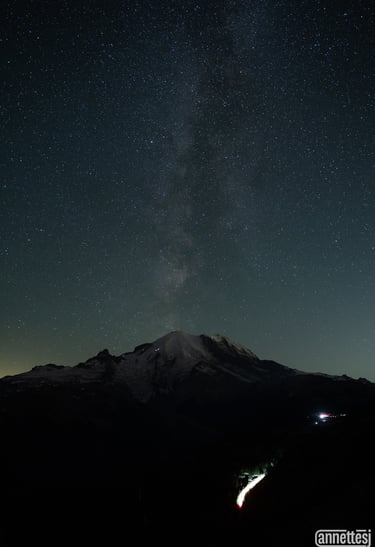
Example of foreground shot. In this case, I was running short on time and took the foreground photos after the sky images. f/2.8, ISO 400, 195 seconds.
Now, on to the sky shots. Turn your ISO up to the 5000 range. Set your shutter speed to what works for spot stars on your camera (10 seconds might be a good start). We will use interval shooting to then take a series of shots all in a row. I have my interval shooting set to start on a slight delay (1-2 seconds) to reduce camera shake from depressing the shutter. Make sure your shooting interval is longer then you exposure time (so for 10 seconds exposure set an 11 second shooting interval). Set your number of shots to 10-20. Now, when you depress your shutter it will take multiple 10-seconds exposure all in a row. The reason for doing this is that later, we will stack these images with a stacking software to reduce noise. This produces better results and more stars than trying to reduce noise with a single image.
Review your images, and see if the stars look sharp enough to you, or if there are any trails. Feel free to experiment, taking a few at different shutter speeds and ISOs. Just keep in mind the Milky Way is always moving relative to you, so it will not be in the target position for your composition the whole night.
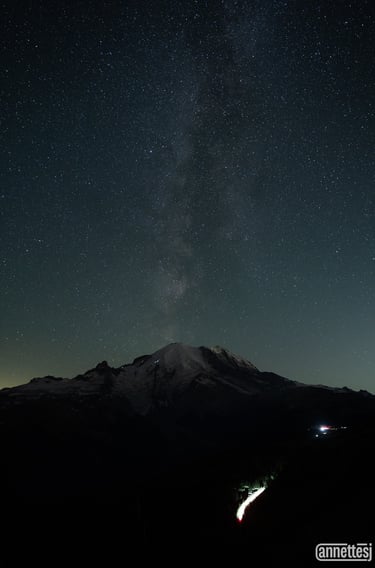
Example of raw sky shot. ISO 6400, f/2.8, 10 seconds.
Stay tuned for Part 2: Processing
Milky Way photos are some of the most challenging but rewarding to shoot. The result is amazing to see, you learn so much through the process, and the experience of having the mountain to yourself out under the stars is unmatched.
Next week I will cover how to process the photos. This will demonstrate how to stack photos to reduce noise, and how to combine the exposure of the foreground and sky.

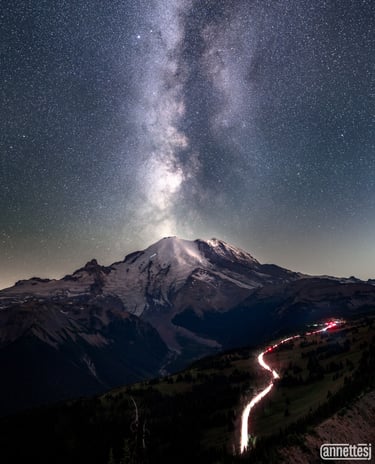
Milky Way over Washington Pass
Contacts
annette@annettesjphoto.com
Socials
Copyright © 2023-2025 Annette Stiers Jones Photography. All rights reserved.