Photographing Abraham Lake: A Winter Landscape Photography Guide
A most unique location only for the most dedicated landscape photographers.
CANADIAN ROCKIESABRAHAM LAKE
Annette Stiers Jones
1/24/20269 min read
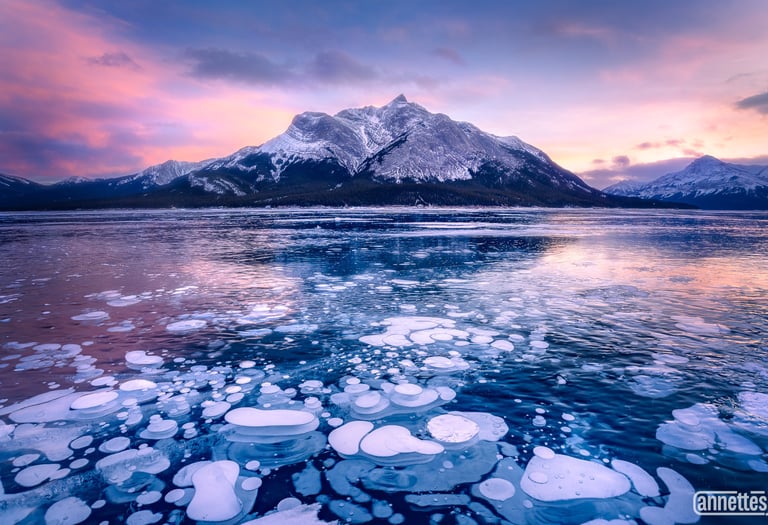
Every winter, a remote glacial lake in western Alberta transforms into one of the most visually striking winter photography locations in North America. Abraham Lake is known for its frozen methane ice bubbles—layered, suspended, and preserved beneath remarkably clear ice.
These bubbles form as methane gas released from decomposing organic material at the bottom of the lake rises through the water and becomes trapped when the surface freezes. Repeated freeze–thaw cycles create stacked formations, sometimes forming dense columns that appear frozen in time beneath the ice.
This guide is based on my personal experience photographing Abraham Lake during a single winter visit. While I aim to share helpful planning and photography insights from my time there, conditions vary significantly from year to year, and this post should be used as a reference rather than a definitive or all-encompassing resource.
Safety Disclaimer: Abraham Lake is a remote, wind-exposed winter environment with rapidly changing conditions. Ice thickness, weather, and access points can vary from day to day. Anyone traveling to or photographing Abraham Lake does so at their own risk. Always assess conditions carefully, monitor weather forecasts, and use your own judgment when determining whether it is safe to be on the ice.
How to Get to Abraham Lake
Abraham Lake is located along Highway 11 in western Alberta, in a remote and rugged section of the Canadian Rockies. Most photographers approach from Banff, combining the journey with one of the most scenic winter drives in North America.
Driving Route: Banff → Icefields Parkway → Nordegg
Depart Banff heading north
Travel along the iconic Icefields Parkway (Highway 93)
Continue past Lake Louise, Bow Lake, and Peyto Lake
Connect to the David Thompson Highway (Highway 11)
Continue east toward Nordegg
Abraham Lake runs alongside Highway 11 for many miles, with multiple pullouts and access points
You'll want to allow at least 3 hours from Banff to Nordegg
Winter Driving Considerations
A valid Canada parks pass is required to drive the Icefields Parkway.
Winter tires are essential. Snow tires are mandatory from November 1 to April 1.
Fill up on gas before leaving Banff and Nordegg. There are no open gas stations between the two in winter.
Check weather, wind, and road conditions before leaving. 511 Alberta is a good resource.
Have an emergency kit available in your vehicle
Don't count on having cell phone service along the parkway. Consider carrying a back-up comms.
Expect drifting snow, black ice, and sudden whiteout conditions
Wildlife is common along this corridor, even in winter.
Stay safe and drive during the day only. Plan to stay in Nordegg so you can properly shoot the lake at sunrise and sunset.
At parking lot pullout areas by the lake, often there is a decline going towards the parking lot and the lake. Make sure conditions are good enough your vehicle can get back up the road to the lot if it is icy.
This is not a drive to rush. Build flexibility into your schedule and avoid driving in deteriorating conditions, especially after dark.
When to Go: Ice Conditions, Timing & Light
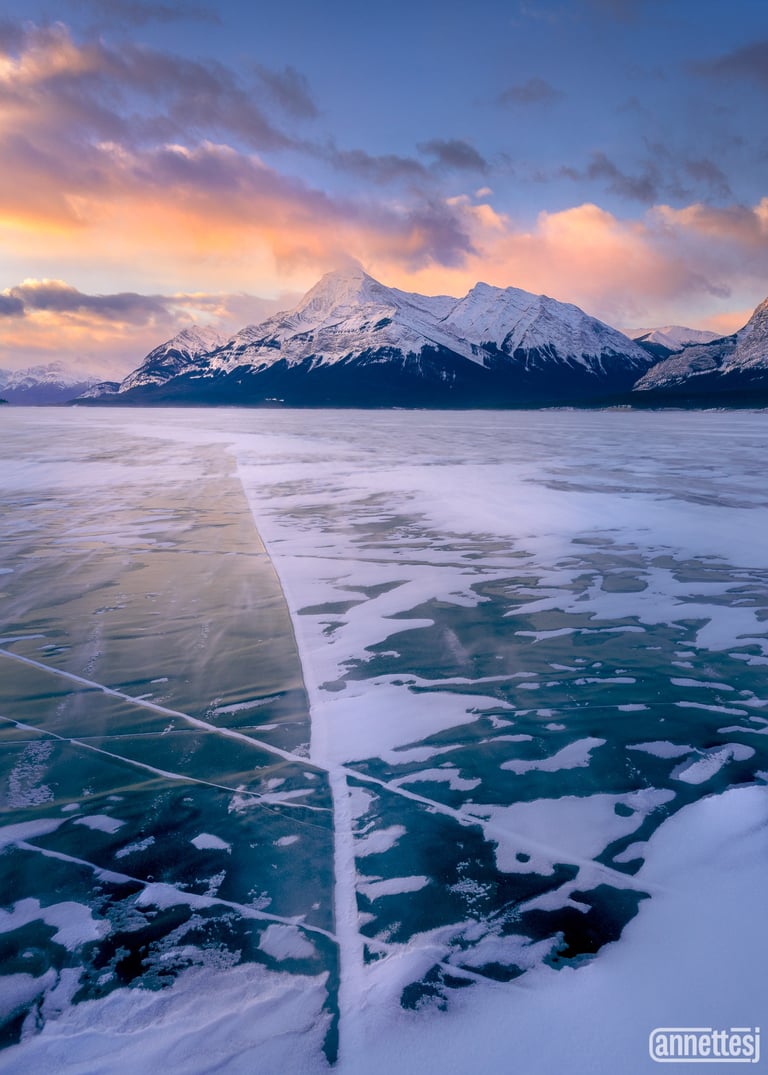
The typical window for photographing ice bubbles at Abraham Lake falls between late December and February, with January often providing the most reliable combination of ice thickness and clarity. However, timing your visit isn’t just about whether the lake is frozen—it’s also about light and sun angle.
During my visit, both sunrise and sunset offered excellent photographic opportunities, particularly for wide-angle compositions using ice bubbles and cracks in the foreground with the mountains in the background.
Sunrise: The sun generally rises from camera left for common mountain-backed compositions
Sunset: Light shifts to camera right, which is equally pleasing as sunrise for compositions including the main peak on the lake Mount Michener
Because of Abraham Lake’s northern latitude and the time of year, golden hour can last longer than many photographers expect. The sun remains low on the horizon, often producing extended periods of soft, directional light rather than a brief window. So get there early, well before official golden hour. It will give you time to find your perfect patch of ice bubbles and stake out compositions.
To plan light direction and timing, apps like PhotoPills are especially useful. They allow you to visualize sunrise and sunset angles, anticipate how light will interact with the mountains, and plan compositions in advance.
Essential Gear for Photographing Abraham Lake
Photographing Abraham Lake in winter requires thoughtful preparation. Strong winds and extreme cold can make conditions feel harsher than temperatures alone suggest.
Camera Gear
Wide-angle lens (16–35mm)
50 mm lens for abstract shots of ice bubble close-ups
Sturdy tripod with good wind stability. I would definitely consider bringing something with good capability for low to the ground shots.
Extra camera batteries (cold drains them quickly)
Lens cloths for frost and blowing ice
Optional polarizing filter. I didn't use mine as I really wanted to capture the reflection of the mountain in the ice.
Cold Weather Gear
Insulated, waterproof winter boots
Traction spikes or microspikes for ice
Heated mittens or gloves (I really like the ice-fishing style mittens that have a flip cover so you can keep your fingers warm between shots, but be able to press buttons when you need to.)
Thin layer gloves to go under the heated mittens. Even the brief periods of exposure without the mittens to operate the camera are uncomfortable!
Heated socks
Wool socks to go over the heated socks
Layered insulation system: base layer, fleece layer, ski coat/pants
Headlamp for low-light conditions
Warm hat and balaclava ski mask
Does this seem like overkill to you? Trust me, it's not. I expected it to be cold, and I know I am averse to cold, so I really thought I overprepared with layers. But it is the WIND that really makes it extra-biting cold.
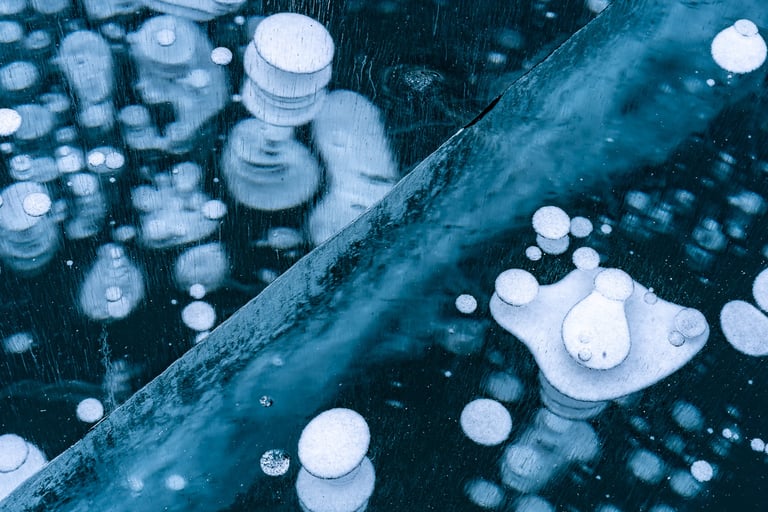
Compositions: Photographing the Ice Bubbles
Abraham Lake strongly rewards low, wide-angle compositions that emphasize foreground detail. It is the perfect way to make these bubbles look big and really stand out in the foreground. Getting low to the ice surface also minimizes the amount of mid-ground in the shot, which can make the photo look busy and cluttered. And, Mount Michener and the surrounding peaks make for a perfect background.
Another option is to shoot looking straight down at the ice for an abstract shot of just the bubbles themselves. These can be compelling images all on their own.
Composition Tips for Wide-Angle Shots
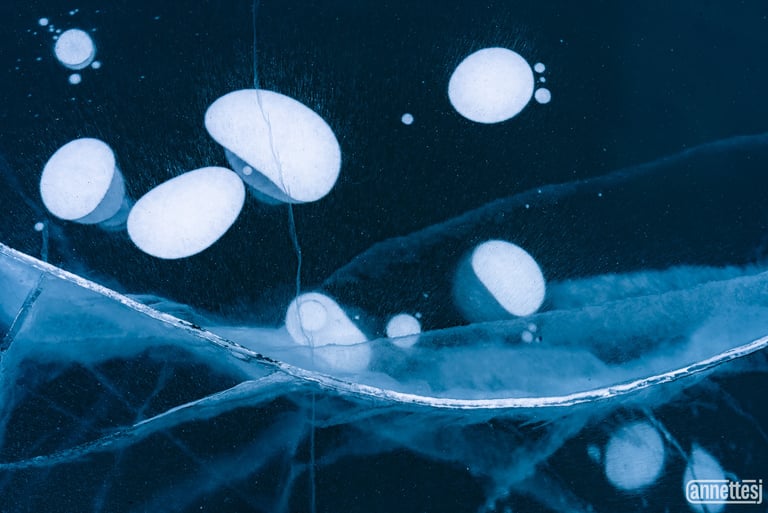
Get very low to the ice to maximize foreground impact. I even took one photo with an ice crack by setting the camera directly on the ice surface. I used my Sony A7RV's auto-focus stack setting to achieve this (meaning I did not have to refocus and press the shutter again, it was all automated.) This allowed be to take this shot without disturbing the camera between the multiple shots for the focus stack.
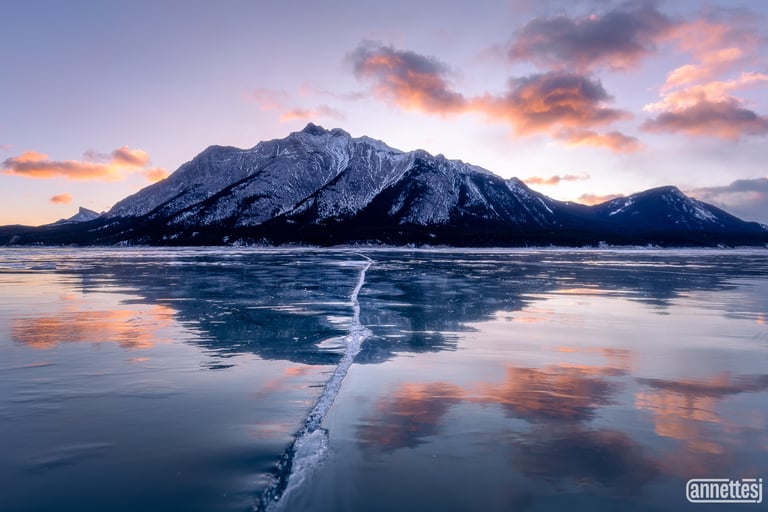
A focus-stacked image of an ice crack leading to Mount Michener. This was shot by placing the camera directly on the ice and shooting the focus-stack on auto.
Use ice bubbles and ice crack patterns as leading lines to carry the eye into the image.
It can take some time to shop around and look for the perfect patch of bubbles. Get there early and look around. I will be honest, one day it was so windy, I dared not move again after finding one suitable bubble patch. Had I not been so afraid of being blown over, I would have kept looking for as many different compositions as I could find before the good light is gone.
Watch for distracting elements. There will often be cracks in the ice going horizontally across the lake, which can block the progression of the eye through the photo. There are also many imperfection in the frozen lake surface: ripples, scratches from ice skates and traction, bubbles that just simply look too cluttered and noisy. You can always clean up to some extent in post by removing distractions, but you don't want to end up having to remove a significant portion of the image.
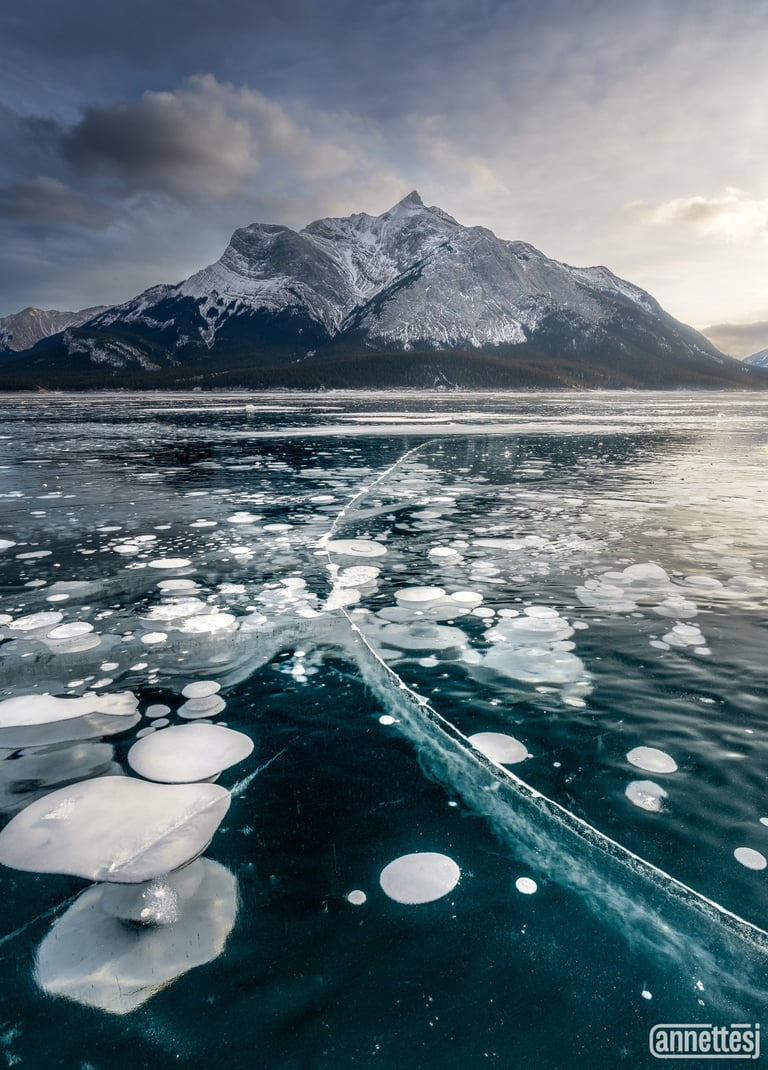
Ice bubbles and cracks as leading lines from foreground to background.
You may find at times to find all those lovely bubbles covered up with snow. That's what happened to us one morning. But, this is really just another composition opportunity. The wind will likely still be blowing and creating interesting patterns of drifting and blowing snow. This can make great leading lines.
Blowing snow on the lake surface as a leading line from foreground to background.
Composition Tips for Abstract Bubble Shots
These can be great to shoot before golden hour as you are looking for your wide angle compositions.
For these, I hand held the camera and looked mostly straight down to a slight angle. I eventually moved to using a tripod.
Watch out for your own reflection in the ice when shooting these.
Look for interesting combinations of bubbles and ice cracks when choosing compositions. Diagonal ice cracks can be a great tool to create energy and flow in your image.
Ice bubbles with a diagonal ice crack
Ice bubbles appear to float on a wave-shaped ice crack
Camera Settings
Wind is often the biggest technical challenge at Abraham Lake and should be kept in mind when choosing settings and setting up your tripod. Keeping it low to the ground will help your composition and the stability of the camera.
Starting Point Settings for Wide Angle Shots of Ice Bubbles with Mountains
Focal length: 16–35mm lens, I was in the 16-25 mm range for most of my wide angle shots.
Aperture: f/11–f/16 for depth of field is best for getting your ice bubbles in focus and your background mountains in focus, BUT, you will most definitely still have to focus stack. I even went as wide as f/8 on a few shots and stacked successfully.
ISO: 100–200 when possible. I did go up to ISO 400 at times so I could get exposure at an acceptable shutter speed. If wind is strong, prioritize shutter speed to maintain sharpness, even if that means increasing ISO slightly.
Shutter speed: Fast enough to counter wind-induced vibration. I was at 1/40-1/100 s mostly, and even 1/5 s was ok for some shots.
Post-Processing: Bringing Out Ice Bubbles & Texture
Post-processing plays a key role in revealing the depth and structure of the ice.
Key Adjustments in Light Room
Increase Clarity to enhance bubble and ice crack definition. I was pretty liberal with this slider. I applied these edits with a selective mask to the bubble and ice crack area of the lake.
Use Dehaze subtly can also help bring out cracks and layers. I was more conservative with dehaze as this can over darken/saturate pretty quickly.
Focus Stacking in Photoshop
For ultra-low, wide-angle compositions, depth of field can still be limited even at smaller apertures. Focus stacking allows you to blend multiple focus points into a single sharp image from foreground bubbles to distant mountains. Check out my previous guide on focus stacking to learn more about this process.
Distraction Removal
Expect to spend some time removing stray ice cracks, errant bubbles, ripples, and scratches that distract from your composition. The lake is HUGE and there are so many places to find compositions, but rarely is there one that is perfectly perfect on its own.
Final Thoughts
Photographing Abraham Lake is as much about preparation and patience as it is about composition. When conditions align, the combination of methane bubbles, fractured ice, and sweeping mountain backdrops creates one of the most unique winter photography experiences in North America.
While the pictures make it look so sublime and peaceful, it is really quite an inhospitable place to be! So when I say it for the most dedicated landscape photographers, I mean that. It is not a place to bring your friend that isn't into photography. Most people will get out, walk around a bit, and go back to their cozy car. But as a landscape photographer, you are out there scouting well before golden hour, shooting one composition after another until the sun sets two hours later. You are slipping and sliding on the ice and constantly assaulted by the unrelenting wind. You're bent over you camera for those low angle shots, and your fingers are freezing as you operate your camera in the bitter cold.
But in the end, it is all worth it. It is the most unique location, an experience to remember, and results in some really epic winter landscape photos.
Contacts
annette@annettesjphoto.com
Socials
Copyright © 2023-2025 Annette Stiers Jones Photography. All rights reserved.