Capturing the Milky Way Part 2: Post Processing
How to edit your photos for the best noise reduction and preservation of stars
POST-PROCESSINGMILKY WAY
Annette Stiers Jones
5/11/202514 min read
Milky Way photos are some of the most awe-inspiring you can capture. The visual of a galaxy surrounded by thousands of stars over a beautiful landscape is truly something special. And so, I seek to edit my Milky Way photos for the greatest preservation of detail with the tools I have available, to showcase this wonder and print in large format. I use three programs to process my Milky Way photos: Sequator, Lightroom, and Photoshop.
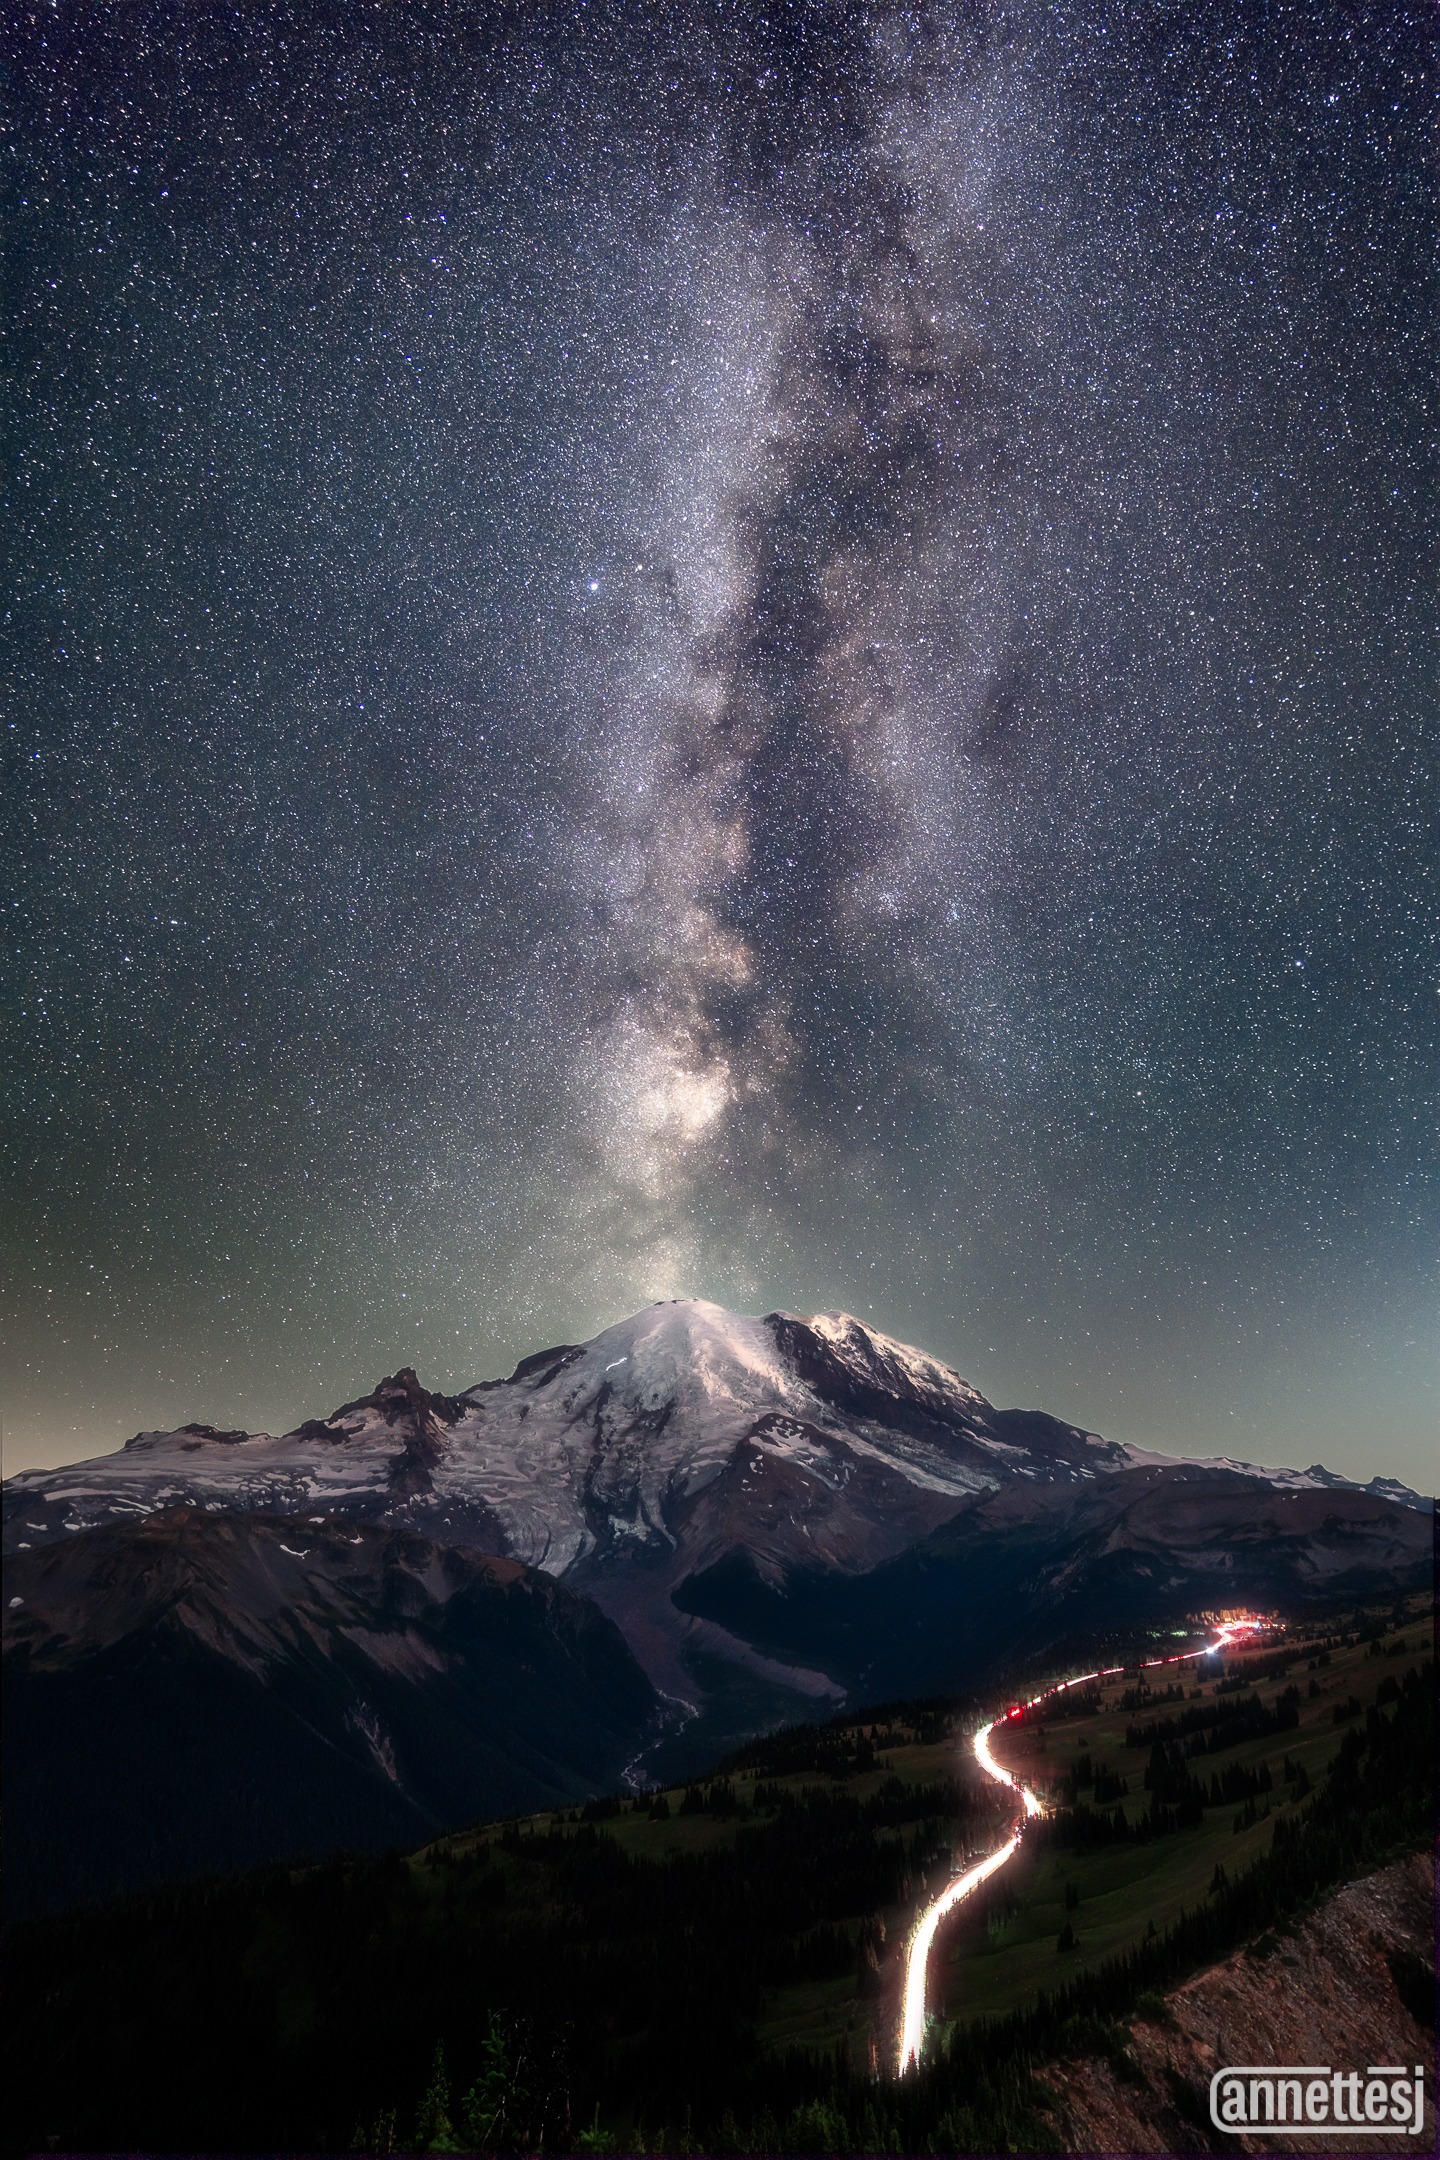
This blog post is part 2 of a 2 part series. Shooting the images was captured in Part 1. The components needed to make the final image include 10 exposures of around 10 seconds each for the Milky Way/sky, and at least one image exposed for several minutes to capture the detail of the foreground, all from the same camera, same tripod, same place without moving it or changing focal lengths. I will use this image of the Milky Way over Mount Rainier as an example.
Having those pieces, the basic steps for processing are:
1) Stack your sky images in Sequator to reduce noise.
2) Apply initial edits to your sky image and foreground image in Lightroom
3) Import your sky and foreground image into Photoshop to blend the sky and foreground together and apply final adjustments to image.
In this week's blog, I'll break down each step of the process using photos of the Milky Way over Mount Rainier. You can see more examples of Milky Way photos here in my gallery.
Step 1: Stack Sky Images in Sequator
The first step to getting a clean, noise free sky image is to download Sequator. You can find Sequator here. It is, remarkably, a free program. I enjoy Sequator because it is easy to use and produces good results. I have tried other programs, but I found those to be too complicated and lacking good tutorials for how to use them. When you click download, it will download a zip file; extract the folder, then double click on Sequator.exe.
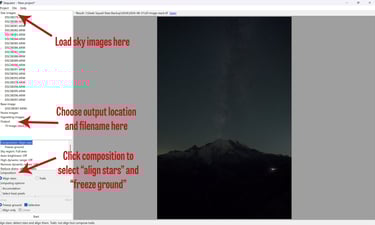
Sequator opens, and you will see a panel on the left. The top panel is for basic inputs; the main ones we will use are "Star Images" and "Output." Double click "Star Images". It will then open an explorer window, and you can navigate to the folder with your sky images and select them. Click on the first image in your series of sky images, then hold Ctrl+Shift to click on the last image. I recommend you include at least 10 images. I have tested 5, 10, 15, and 20 images, and there is a visual difference between 5 and 10. 10 images and above have greater clarity of the Milky Way, and less color noise of the sky. Click Open after selecting your images.
Next we need to tell Sequator where we want to save the Output file. Double click on Output. An explorer window will open. Navigate to the folder where you want to save it (I like to save it to the same folder as my RAW files). Then give a name to the file, and click Save.
There are some other inputs in this panel: Base Image, Noise Image, and Vignetting Images. Sequator will automatically select the middle file in your sequence as the Base Image. The other two are optional; you can read more about what they do here.
Now we can navigate to the bottom panel on the left. This is where we direct Sequator on how we want it to compile the images. Click on "Composition." As you click on the option, the bottom of the panel will toggle to show the options for your selection. Composition has two radio buttons; Align Stars and Trails. We want to align stars for this composition, so select this option.
Next, we want to select our Computing Option. In this example, we have captured all the images including foreground on a fixed tripod without moving it (no star trackers), so we want to select the "Freeze Ground" option.

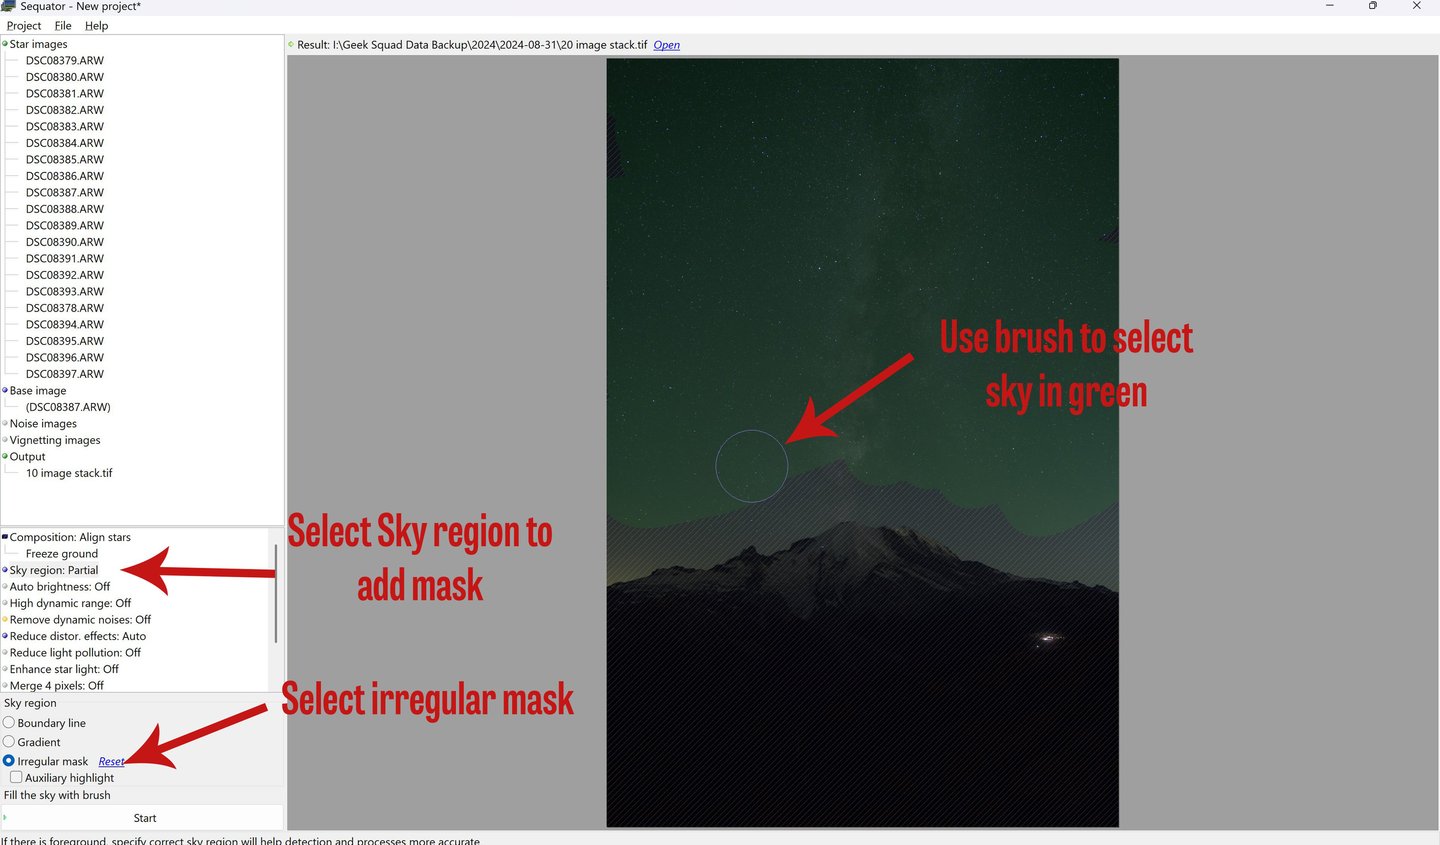
Now click on "Sky Region." We want to choose for this example "Irregular Mask," so we can by hand paint in the part that is sky with a brush. It is a similar function to masking in Lightroom. When you click "Irregular Mask" and move your cursor over the photo, you will see a circle indicating the size and position of your brush. Left click and move the brush over the sky; it will indicate in green where the mask for the sky is placed. You can right click and move the brush to erase the mask, or you can click "Reset" by the Irregular Mask toggle to remove the whole thing. Use the mouse wheel or pinch the track pad to adjust the size of the brush. It does not have to be perfect, but I do prefer to have the mask bleed into the foreground as opposed to missing any part of the sky. I have seen artifacts appear at the edge of the horizon if the sky is not fully selected by the mask.

There are other options to play with in this panel, but I do not generally find it necessary to use these. Click start, and Sequator will begin computing. At the end, it will output a single finished image to the folder and file name you designated.
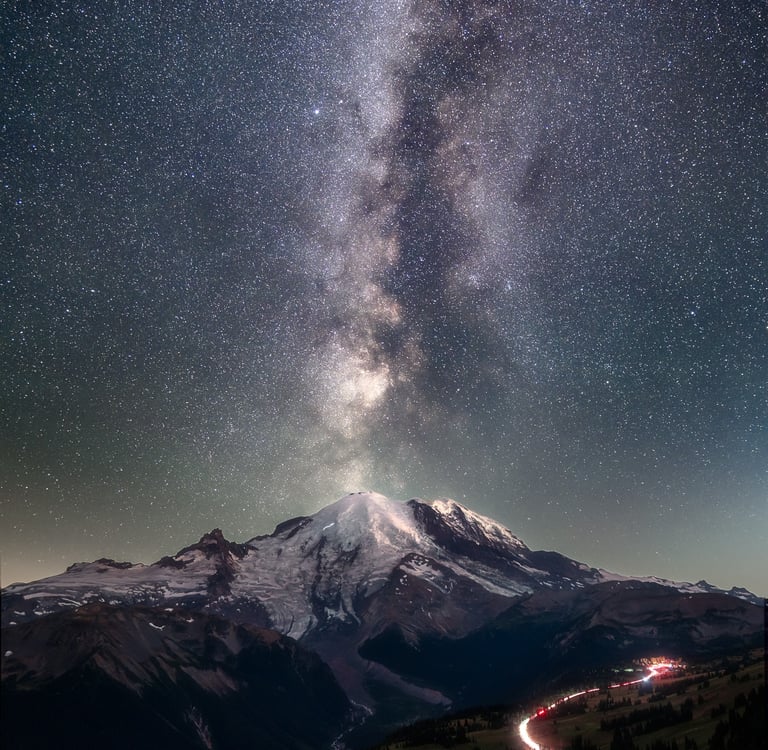
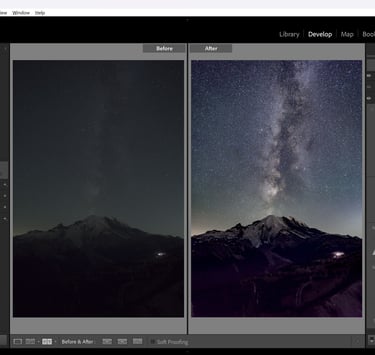
Sequator produces very nice results as compared to a single image. There is less noise and more stars. Using denoise slider on a single image leaves you either with visible noise or less stars, depending how far you push denoise. I also compared this to using Lightroom's AI denoise on a single image. I must say that Lightroom denoise AI did a decent job. I do think though for producing large format prints, Sequator is still superior. On zooming in to 100%, I can see some artifacts in the sky of the Lightroom AI denoise image; there is a pattern in the sky between the stars that looks akin to reptile skin or leather.
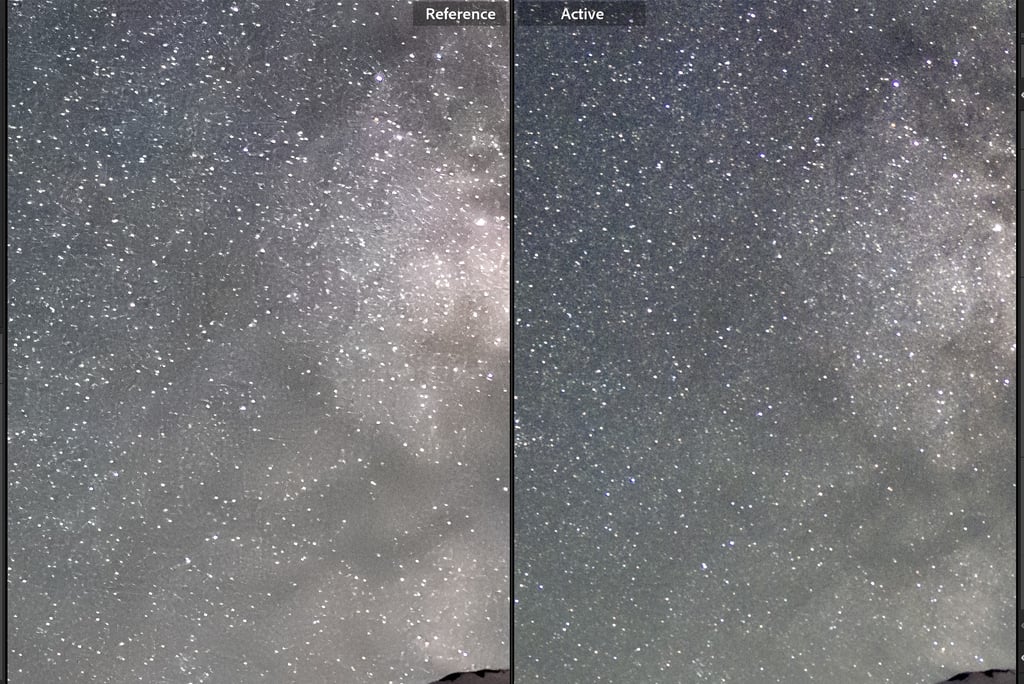
Lightroom Denoise AI on the left vs. Sequator 10-image stack on the right.
Step 2: Lightroom Adjustments
Go to Lightroom, and navigate to the folder with your stacked sky image from Sequator and your foreground image (I like to keep them all in the same folder). You may need to sync your folder to get the new Sequator image to appear; just right click on the folder while in the Library module, and select "Synchronize Folder."
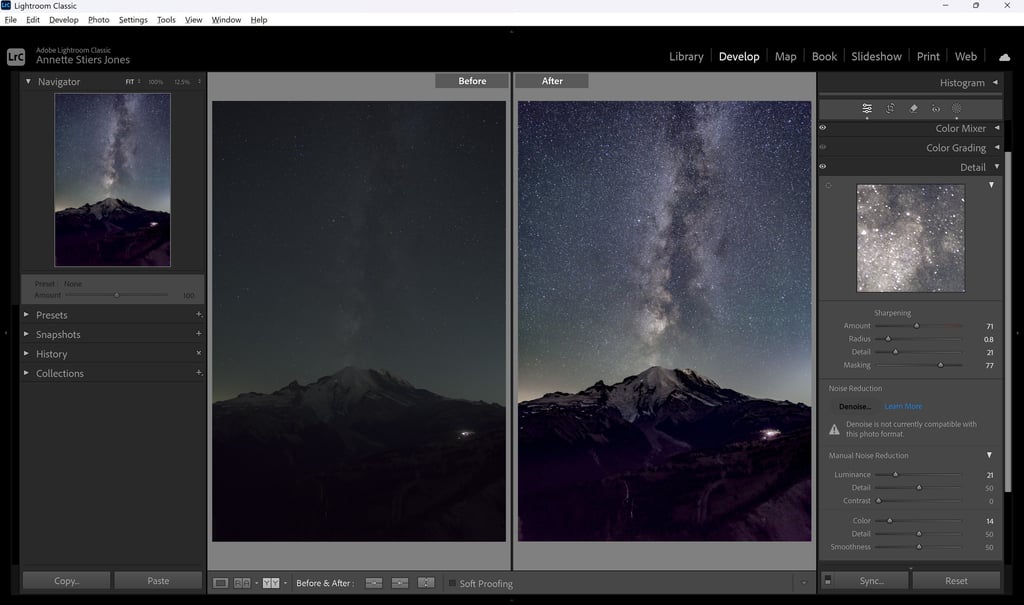
Select your stacked sky image and go to the Develop module. Now, you can adjust your image to your taste. Keep in mind that we really only care about what the sky looks like in this image; we will develop the foreground image later. I like to start by selecting "Auto" in the Basic panel. The image was still too dark, so I increased the exposure. Next, I used the two big levers to really bring out the Milky Way: Clarity and Dehaze. I am pretty liberal with these, going up to about +70 on each.
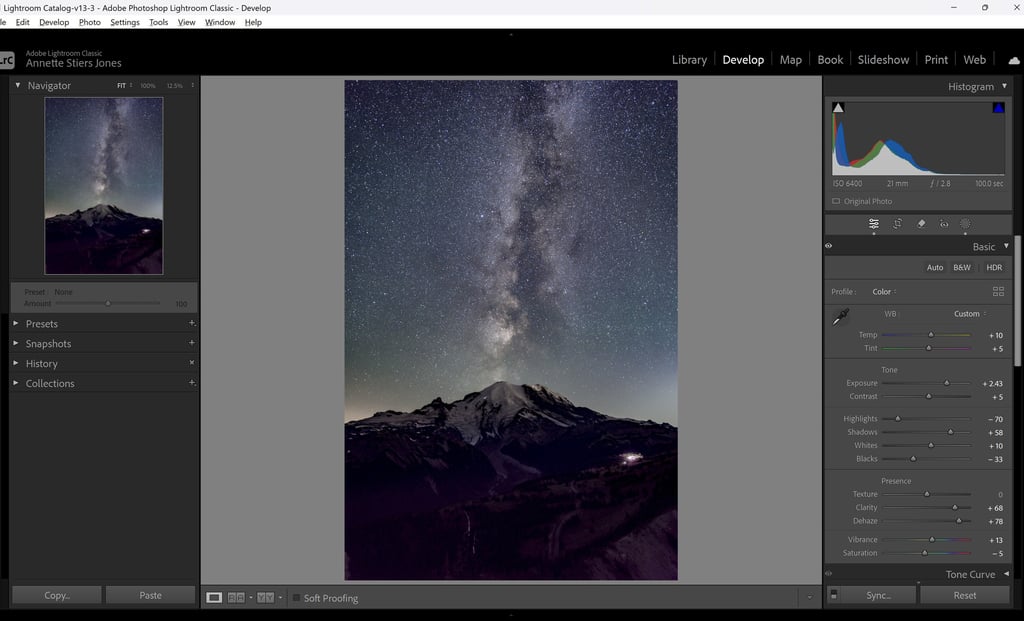
Next I adjust the temperature and tint to taste. My original image came out looking very blue, with yellow on the horizon. I've had this issue before with Milky Way photos at Mount Rainier. Unfortunately there is quite a bit of light pollution near Mount Rainier (near enough to be visible). I have had cleaner colors from darker places, like Washington Pass, and looking out towards the Pacific Ocean at Cannon Beach. To correct this, I adjusted the temperature and tint more towards yellow and magenta. I also added some linear gradient masks. I added one linear gradient mask to increase the brightness of the sky, and a second linear gradient mask to bring down the exposure at the horizon and further adjust the temperature to reduce the yellow in this area. The end result is to have our eye drawn to the Milky Way, and not to the bright light pollution on the horizon.
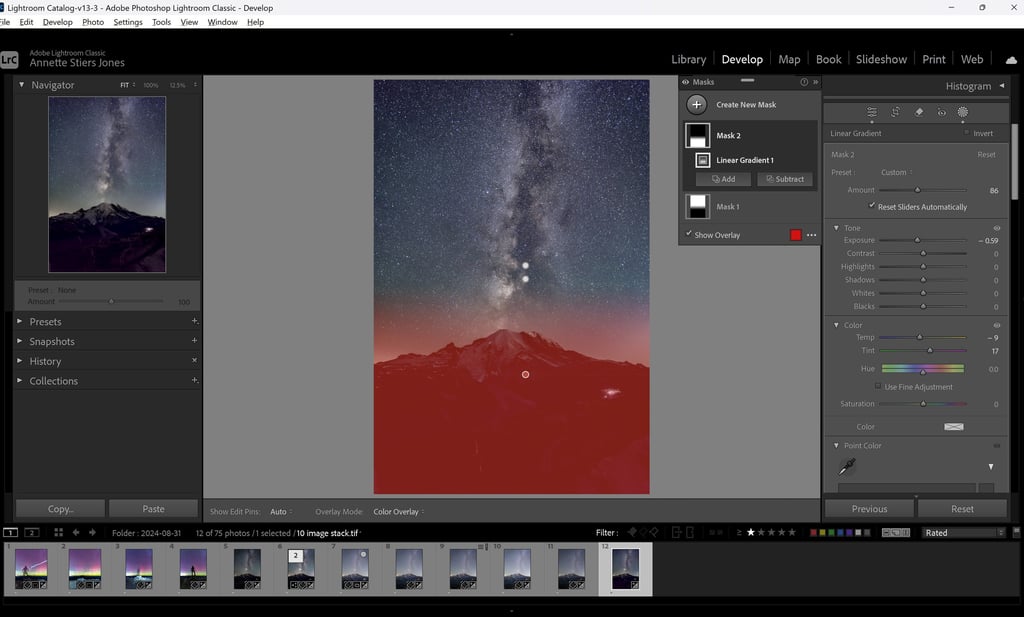
We should also at this stage apply some lens corrections. I adjusted only the Vignetting slider, as there was a very obvious lens vignette in the image. Make sure you apply the same lens corrections to your sky image and foreground image so they will later blend correctly.
Next I go to the Detail panel and make adjustment to noise and sharpening. Some reduction in Color noise is needed, even with the image stacking done in Sequator. Zoom in on your image to 100% to see the results of your adjustments. I adjusted Color noise reduction until the color of the sky between stars is smooth, about 10. I also added a small amount of sharpening and luminance noise reduction. With sharpening, make sure your masking is adjusted very high, about 90. If you hold Alt and click on the slider for sharpening masking, it will show where sharpening is happening in white on black. If this is not done, it will sharpen the sky in between the stars, effectively adding back noise that we do not want.
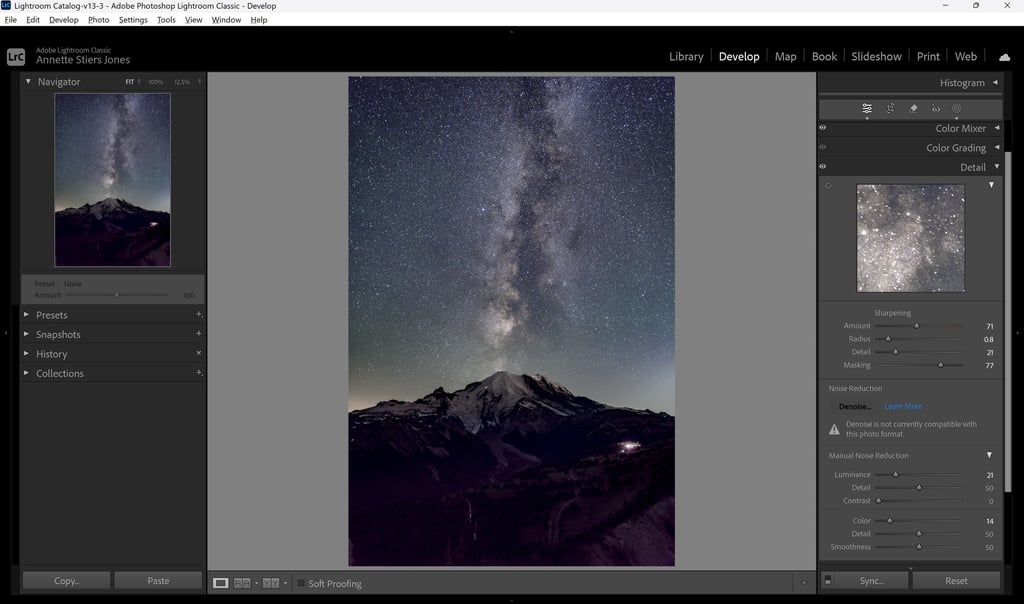
Lightroom Detail Panel Adjustments
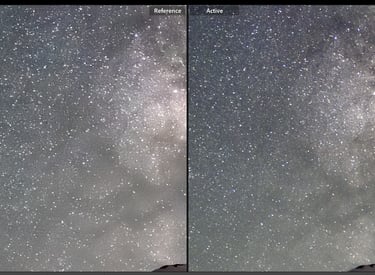
Original 10-stack image from Sequator on left, Lightroom edits applied on the right
Now we can edit our foreground image. I again click Auto from the Basic panel to get started. I adjust Blacks, White, Highlight, Shadows and White Balance to personal taste. I then add a small amount of Texture to bring out details in the foreground. Next make your adjustments for sharpening and noise reduction in the Detail panel.
Another trick you can use to reduce noise in your foreground image is to take multiple foreground exposures. We can then stack those images in Photoshop to reduce noise. It's kind of like stacking the sky images in Sequator, but since the foreground is not moving, we can complete this stack in Photoshop. I will show you how in the next section.
Now we are ready to combine our images in Photoshop.
Step 3: Blend Images in Photoshop
Align Images
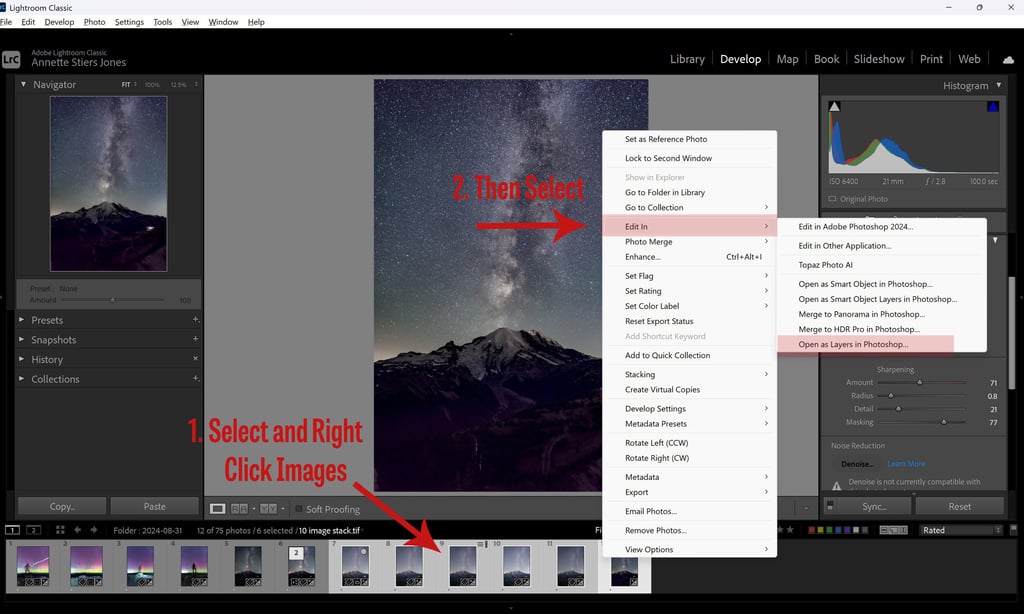
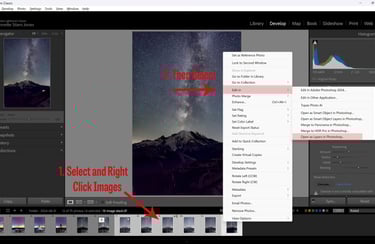
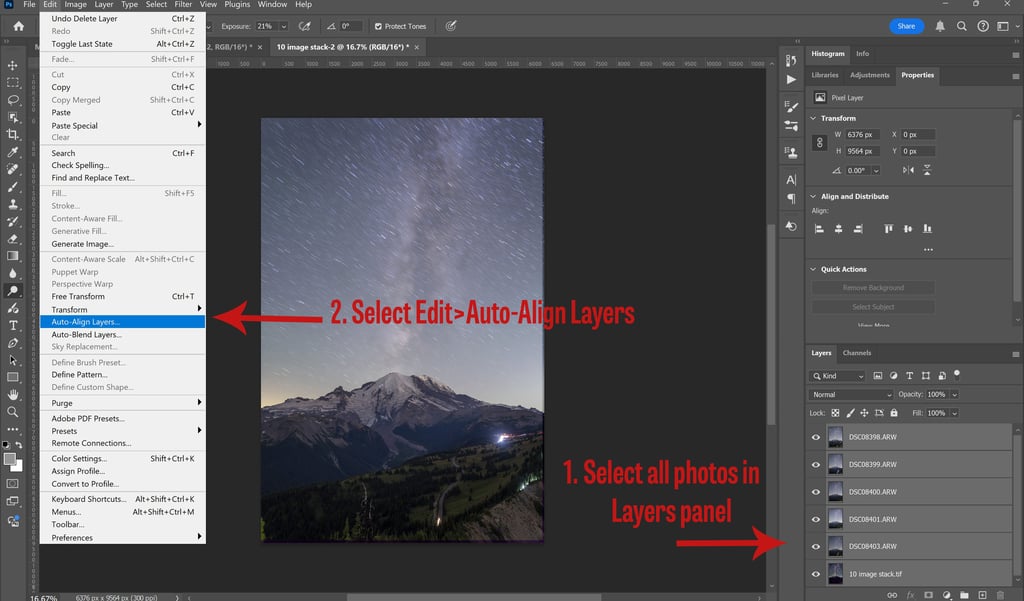
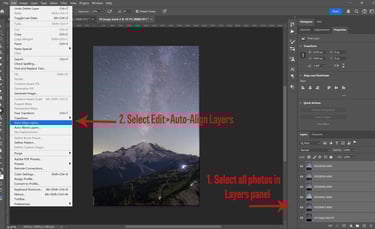
To open your images from Lightroom into Photoshop, select your sky image, press control, and then select all of your foreground images. In my case, I have several foreground images because I took several shots trying to capture car trails. I select all of these, and then right click on one of the images. Choose Edit In > Open as Layers in Photoshop. Photoshop will then open all of these images in one document as different layers. Initially, you will only see the layer on top. The layers are shown in the Layers panel at the bottom right.
Next, select all the layers in the Layer Panel by clicking the top layer, hold Ctrl+Shift, then click the bottom layer. All layers should now be highlighted. Then go to Edit > Auto Align Layers. Click ok, and Photoshop will align all the layers, accounting for any slight variances in movement of the camera on the tripod.
Place your foreground image(s) on the top of the stack, if it is not already there. You can do this by clicking on the name of the layer and dragging it above the other layers in the stack.
Reduce Noise in Foreground Images
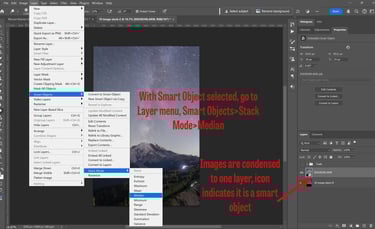
BONUS SECTION: If you have multiple foreground images, you can stack these to reduce noise in the foreground. If you only have one foreground image, skip to the next paragraph. Begin by selecting all of your foreground layers in the Layers panel. Right click on all of these layers, and then select "Convert to Smart Object." Photoshop will then consolidate all of these into one layer; for now, it is just showing the top layer. Select the smart object in the Layers panel, and then go to the Layer menu at the top menu bar. Select Layer > Smart Objects > Stack Mode. Select "Median" from the list. This essentially creates an average of the pixels in each image. Since noise is random, doing this gets rid of quite a bit of noise. Zooming in, I can really see a difference in the number of hot pixels (white, red, blue dots).


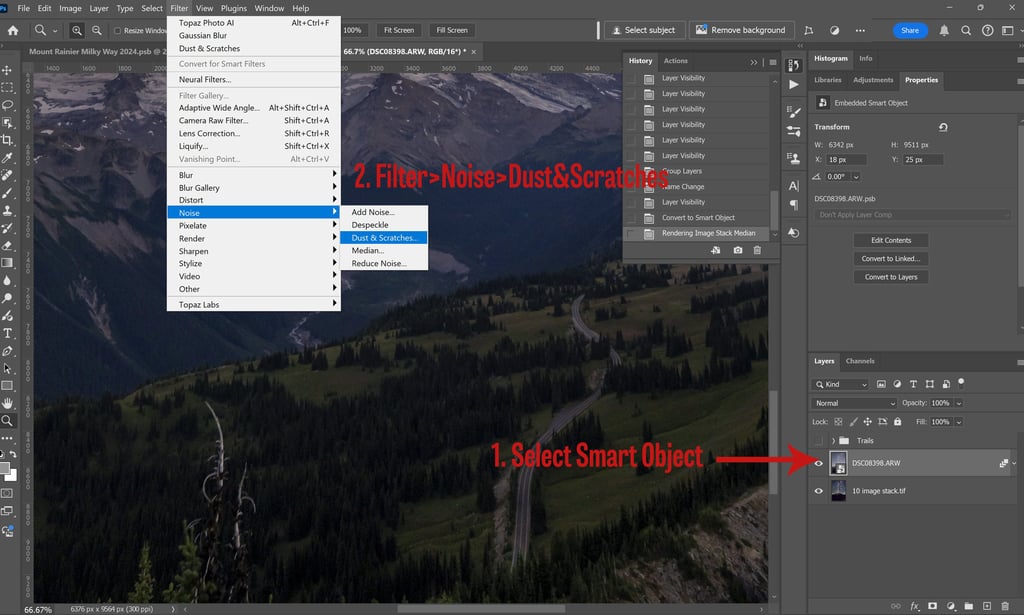
There are still a few hot pixels even after stacking in median mode. To get rid of these, I select the Smart Object in the Layers panel. If you're working with a single foreground image, go ahead and convert it to a Smart Object by right clicking on the layer and select convert to Smart Object. I then go to the Filter menu at the top. I select Filter>Noise>Dust and Scratches. You will then get a dialog window where you can adjust the pixel size and threshold. I keep the pixel size pretty small, around 2 with threshold 11 in this example. You can see live what is happening to the image. Adjust just until the hot pixels disappear; any further and you will start sacrificing sharpness and clarity of your image.


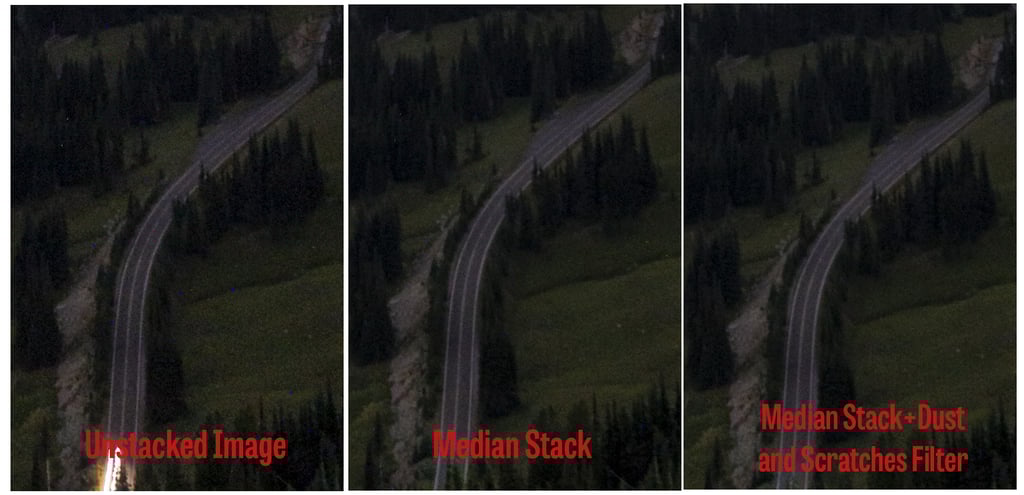
A comparison of the stages of noise/hot pixel reduction for the foreground
Masking
Now we can apply a mask to this layer, so that the sky will show through on the sky portion of the image. With your foreground layer selected, move your cursor to the Object Selection tool in the left panel. You can also use keyboard shortcut "W" to bring this up. Photoshop tends to stack similar tools in the left panel. If you do not see the Object Select tool, you may instead see the Quick Selection or Magic Wand tool. If you right click on these, it will show all 3 options in the stack. You can then select Object Selection.

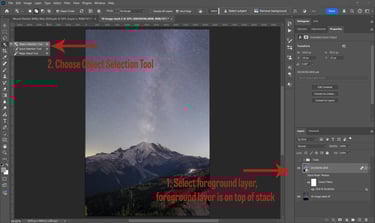
Object Selection tool will bring up a cross hair as your cursor. You can move this over various parts of your image; in this case, I move it over the foreground. It will highlight everything Photoshop thinks is part of the foreground object. Click on it, and dotted lines will appear around where Photoshop has made a selection. In my case Photoshop missed some areas; I then click on the rectangular marquee tool (shortcut "M"). I make sure at the top bar the "Add to Selection" option is toggled (looks like two stacked solid boxes). Then I click and drag a box over any area that Photoshop missed in the initial selection. I now have all of the foreground selected, showing dotted white lines all around the selection area.
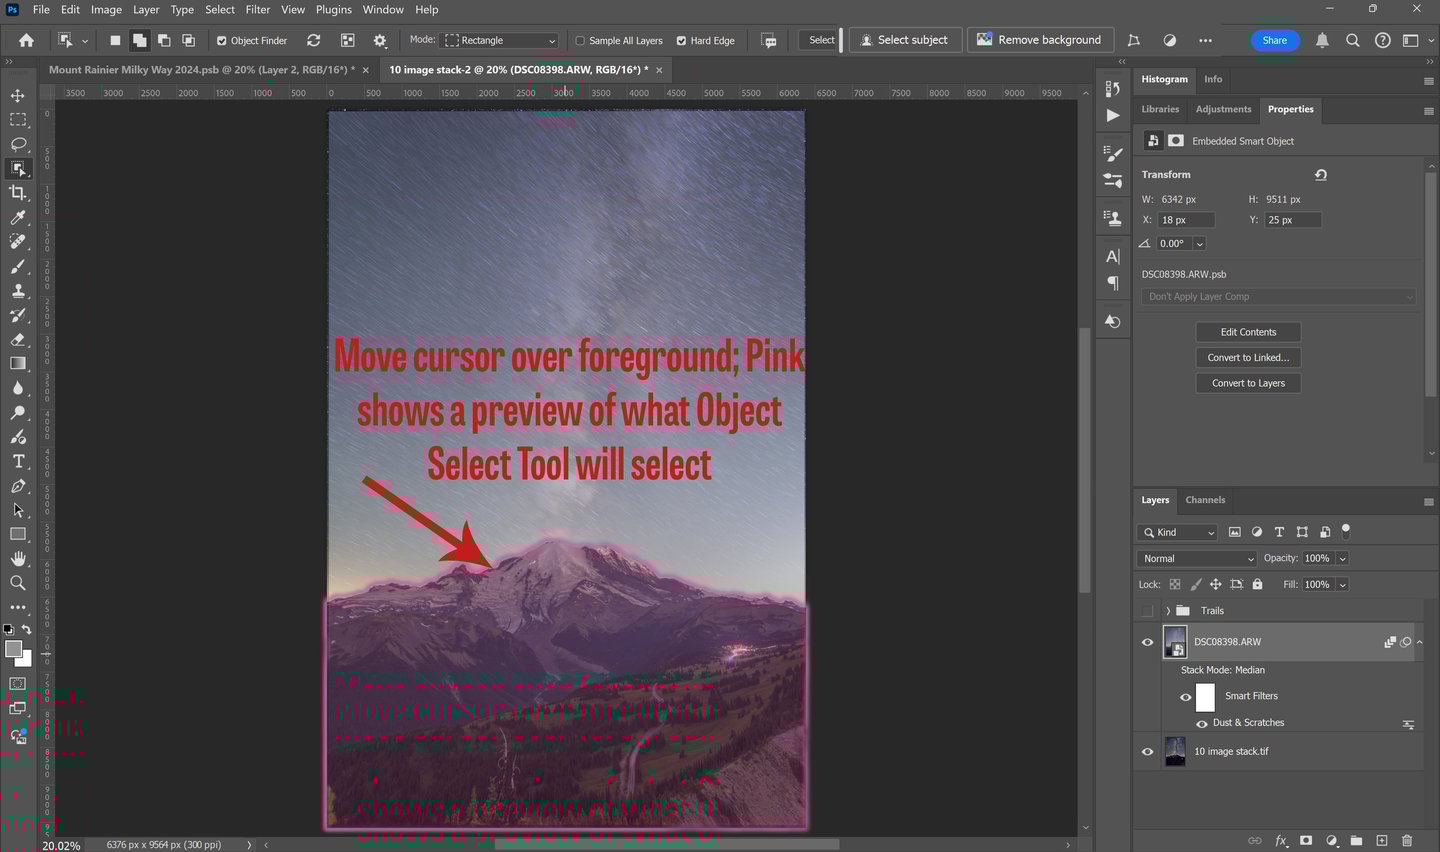

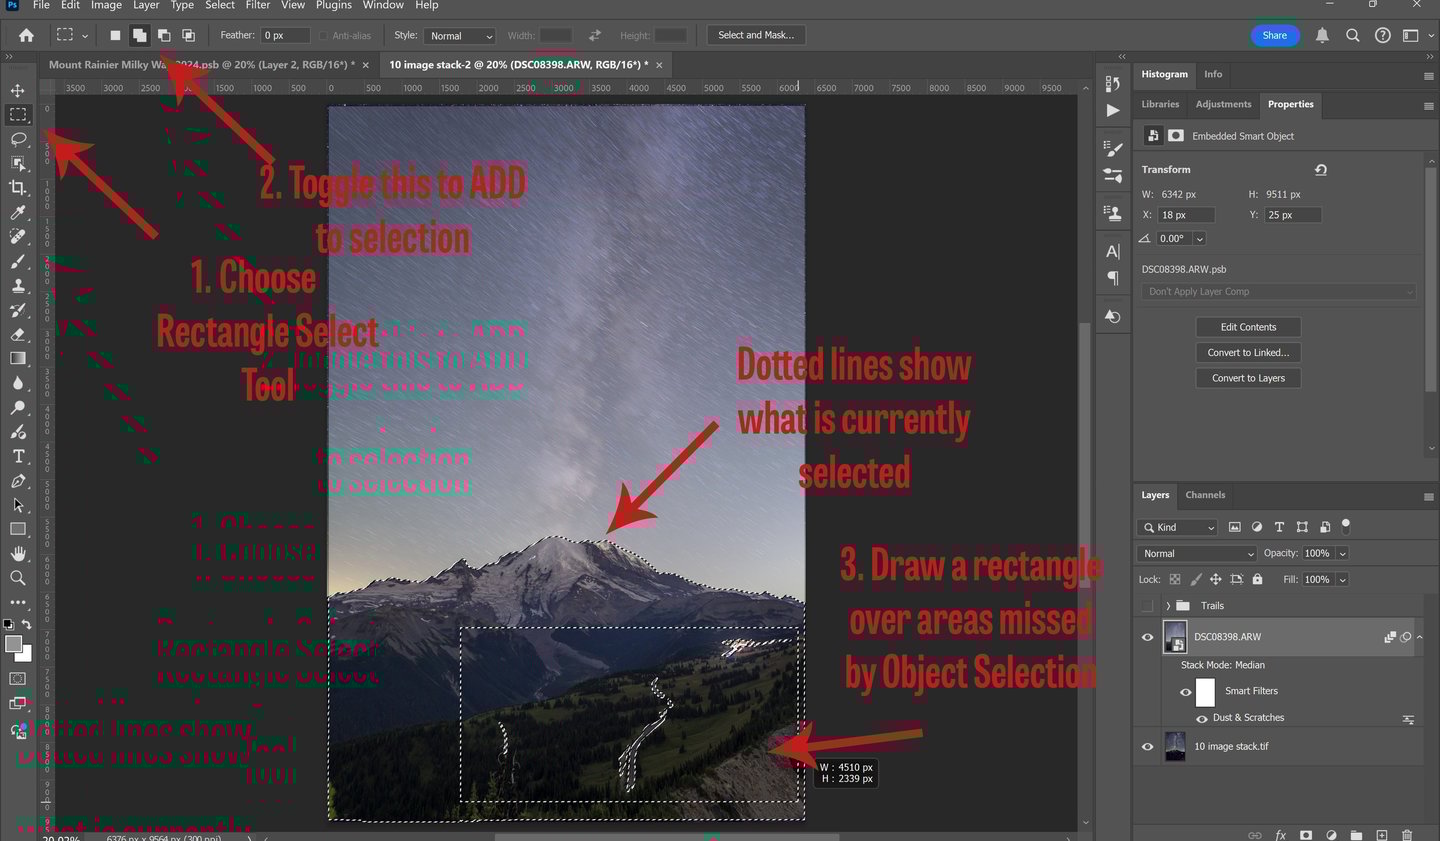
With the foreground layer still selected, I go to the very bottom left corner and click the layer mask tool (the solid rectangle with a cutout circle). Photoshop will then add a mask to the layer of the foreground that is black over the sky and white over the foreground. This is what we want; we want the foreground to be visible, and allow the sky image in the bottom layer to show through.


For this image, Object Select really did a great job of selecting the right area for the mask. Always zoom in and check the border between your foreground and sky, looking for any areas that were missed. These can then be corrected manually with a variety of different tools Photoshop has for masking.
Blending the Layers
We can now see our nice noise-free foreground and sky image together as a whole. We may at this stage see that the foreground and background do not mesh well. Sometimes the brightness or color can be off between the two. To correct this, we can use any number of adjustment layers Photoshop has available. I like to use the Curves layers and Selective Color layers. To add this, first select the layer you want to adjust (either foreground or sky). Then, click the half-circle symbol at the very bottom of the layers panel. You can then select from the list Curves, Selective Color, or any number of adjustments. Photoshop will add that layer above your selected layer. The key thing to be aware of is that this layer will adjust ALL of the layers below. So if you are trying to adjust only your foreground image, and it is above the sky layer, it will actually adjust both things. To make your adjustments apply only to the foreground, click on the adjustment layer in the Layers panel, and press Ctrl+Alt+G. A little arrow will appear indicating only the layer directly below it is not being adjusted.


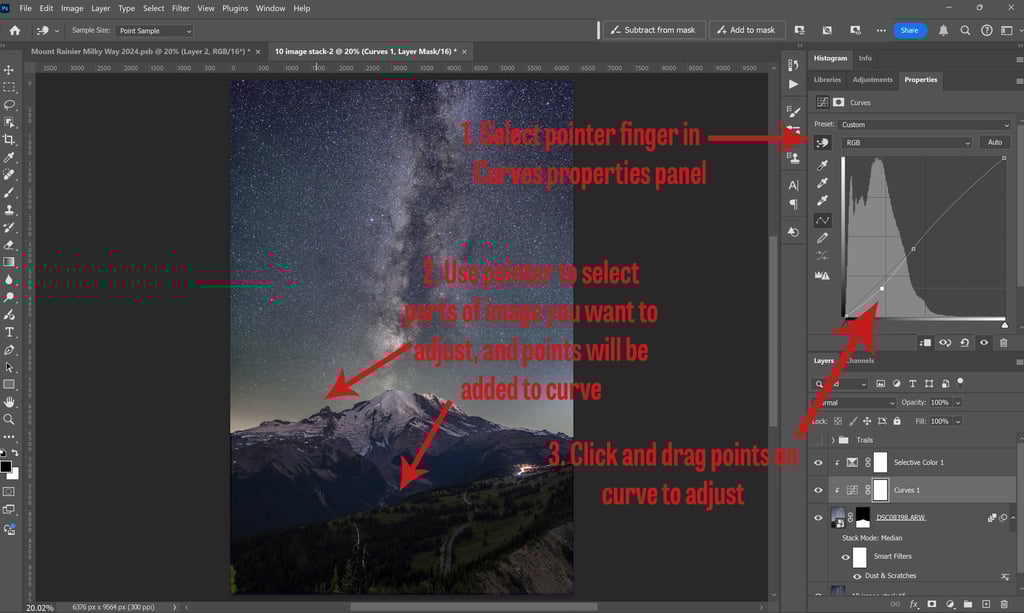
The Curves layer in Photoshop functions very similarly to the Tone Curve panel in Lightroom. To use the Curves layer, select it, and the curve will appear above in the Properties panel. Click on the icon that looks like a pointer finger. You can then use this to select the specific parts of the image that you want to adjust. When you click on those parts, Photoshop will add adjustment points corresponding to those areas on the tone curve. I generally select the areas I want to change, and at least one area that I want to stay the same as an anchor. You can then click and drag the points on the tone curve to bring up or down the shadows and highlights in your image.
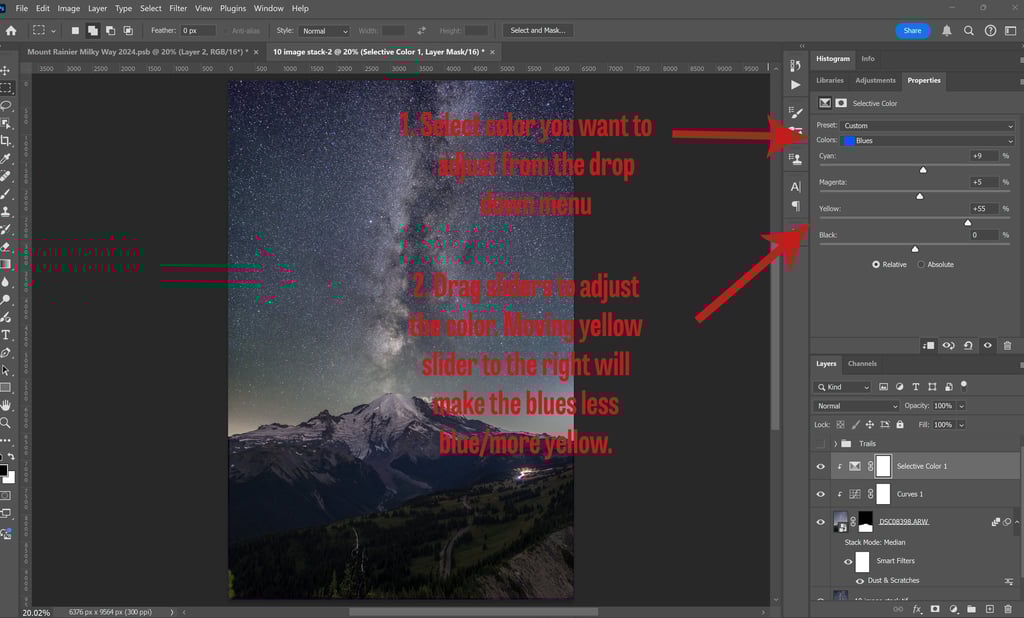
The Selective Color layer functions somewhat like the color mixer in Lightroom. When you select this layer, you will see a Colors dropdown menu and slider bars for Cyan, Magenta, Yellow, and Black in the properties panel. In this image, I thought my foreground was looking too blue, so I selected Blue from the drop down menu. To reduce the amount of blue, I increased the amount of Yellow by dragging it to the right. If you want less of a color, you must increase the opposite of that color. So, the cyan slider is really your red/cyan slider, magenta, is green/magenta, and yellow is blue/yellow.
Final Edits for Wow Factor
Now we have our combined image. We can at this stage add any number of adjustment layers to get the final look we want.
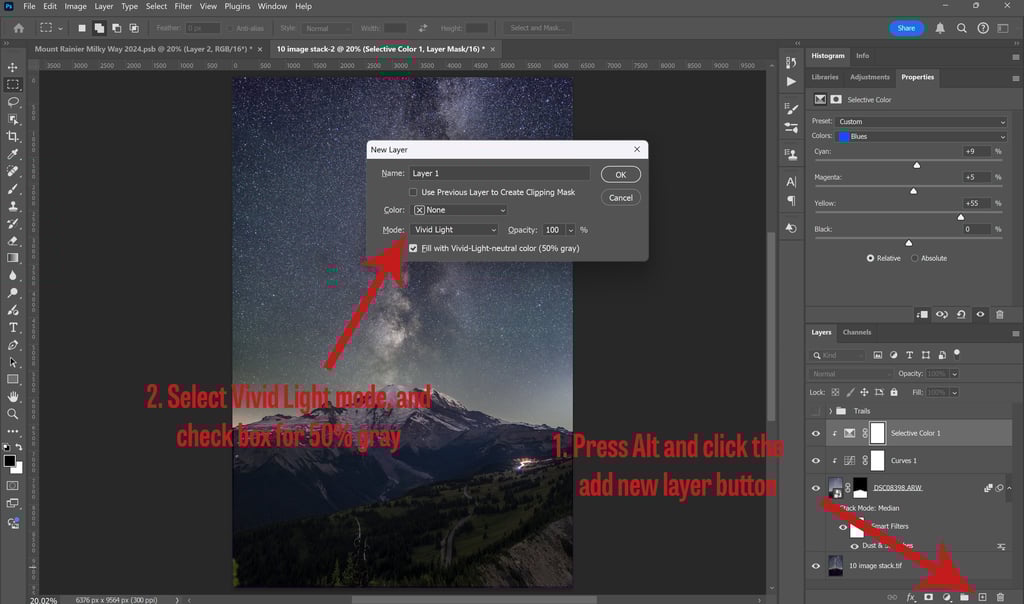
One layer I add on a regular basis to my Milky Way photos is a Dodge and Burn layer. To create this, go to the Create New Layer icon in the bottom right (the plus sign). Press Alt and click the icon. It will then bring up a dialog box. Select "Vivid Light" from the Mode drop down. Then check the box to fill the layer with 50% gray and click ok. Make sure this layer is on top of all of your other layers.

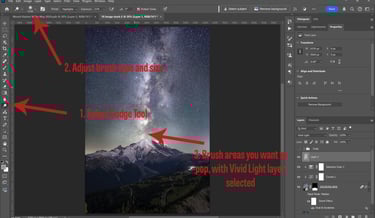
Now select the Dodge Tool from the left hand panel. It looks like a magnifying glass (shortcut O). You will then see a circle where your cursor is, like a Brush Tool. You can adjust the Dodge tool in a similar way as the Brush tool. In the top left you can click on the carrot symbol to adjust it. I like to select Soft Round Pressure Opacity and Flow from the General Brushes folder. I use this in combination with a Wacom pressure sensitive tablet and pen.
Having set up my brush, I make sure I have the vivid light layer selected. I then brush on the sections where I really want highlights to pop. This includes areas like the core of the Milky Way and the top of the mountain. If you make a wrong stroke, you can always hit Ctrl+Z to undo your last stroke. I tend to overdo it a bit, and then later I dial back the intensity of the entire layer to taste. This is done by reducing the opacity or fill percentage of the Vivid Layer in the Layers panel.

The Final Step: Print Your Amazing Work
While this process involves more steps and work than a single exposure, the results for large format prints are worth the effort. This process gives a great result for noise reduction and retention of star detail. If you'd like to know more about printing your photos, take a look at this past blog post. And, if you'd like to see more Milky Way photos, be sure to check out my gallery here.
Contacts
annette@annettesjphoto.com
Socials
Copyright © 2023-2025 Annette Stiers Jones Photography. All rights reserved.